Introduction
What happens when you give a team of cybersecurity students the task of building a network, attacking another team's infrastructure, and defending their own? You get a crash course in real-world security operations.
This was our Red vs Blue exercise, a comprehensive cybersecurity project where Team C had to:
- Build a complete virtual enterprise network from scratch using Proxmox, VyOS, and pfSense
- Deploy security monitoring with Wazuh and Sysmon
- Attack a rival team's network to find vulnerabilities (Red Team)
- Defend our own infrastructure through monitoring and response (Blue Team)
Team Members: Pranay Garapati, Swarupa Jeedimetla, Dheeraj Kumar Ammineni, Manisharan Chakali, Brahmendra Chowdary Ponduri
Institution: Saint Louis University - Master of Science in Cybersecurity
Project: Week 15 Final Project
Building the Foundation: Network Architecture
Designing Our Network
The first challenge was designing a network that would be both functional and secure. We needed clear boundaries between public and private zones, proper routing, and multiple layers of defense.
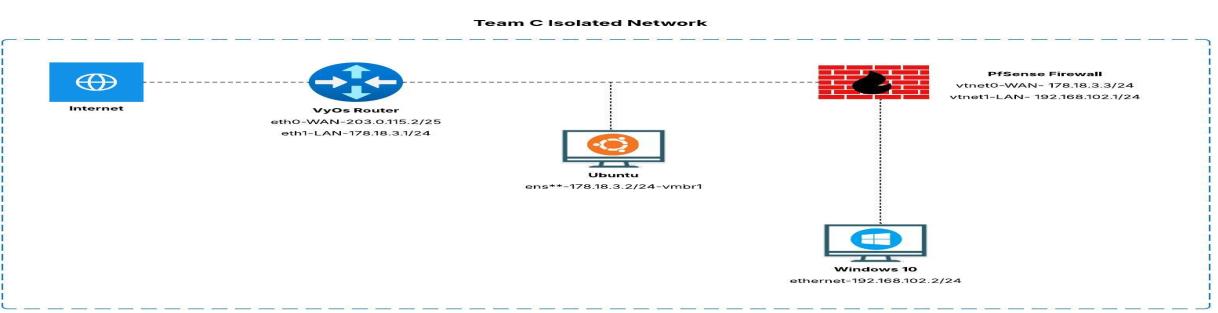 Our Team C isolated network architecture - showing the VyOS Router, Ubuntu Server, pfSense Firewall, and Windows 10 Workstation
Here's what we built:
- VyOS Router - WAN: 203.0.115.2/25, LAN: 178.18.3.1/24 (our edge router)
- Ubuntu Server - 178.18.3.2/24 (hosting our Wazuh SIEM)
- pfSense Firewall - WAN: 178.18.3.3/24, LAN: 192.168.102.1/24 (security gateway)
- Windows 10 - 192.168.102.2/24 (our protected endpoint)
Setting Up Proxmox
We used Proxmox VE 8.4.0 as our virtualization platform. It's powerful, open-source, and perfect for running multiple VMs simultaneously.
 Proxmox VE login screen
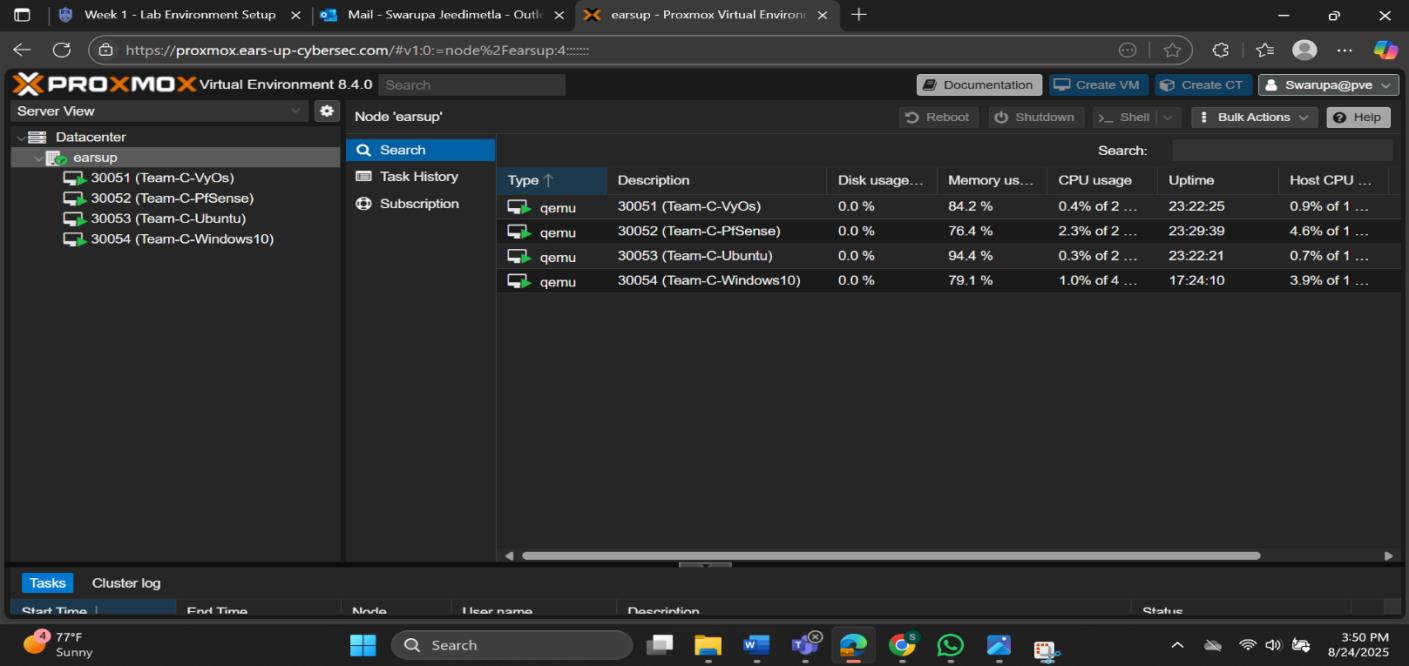 Our Proxmox dashboard showing all VMs - VyOS, pfSense, Ubuntu, and Windows 10 running smoothly
Configuring the Router: VyOS
Getting the router right was crucial. VyOS handles all the routing between our WAN and internal networks, plus NAT for outbound traffic.
The configuration was straightforward but required attention to detail:
- WAN interface (eth0): 203.0.115.2/25
- LAN interface (eth1): 178.18.3.1/24
- DNS servers: 8.8.8.8, 1.1.1.1
- NAT: Source NAT for outbound traffic
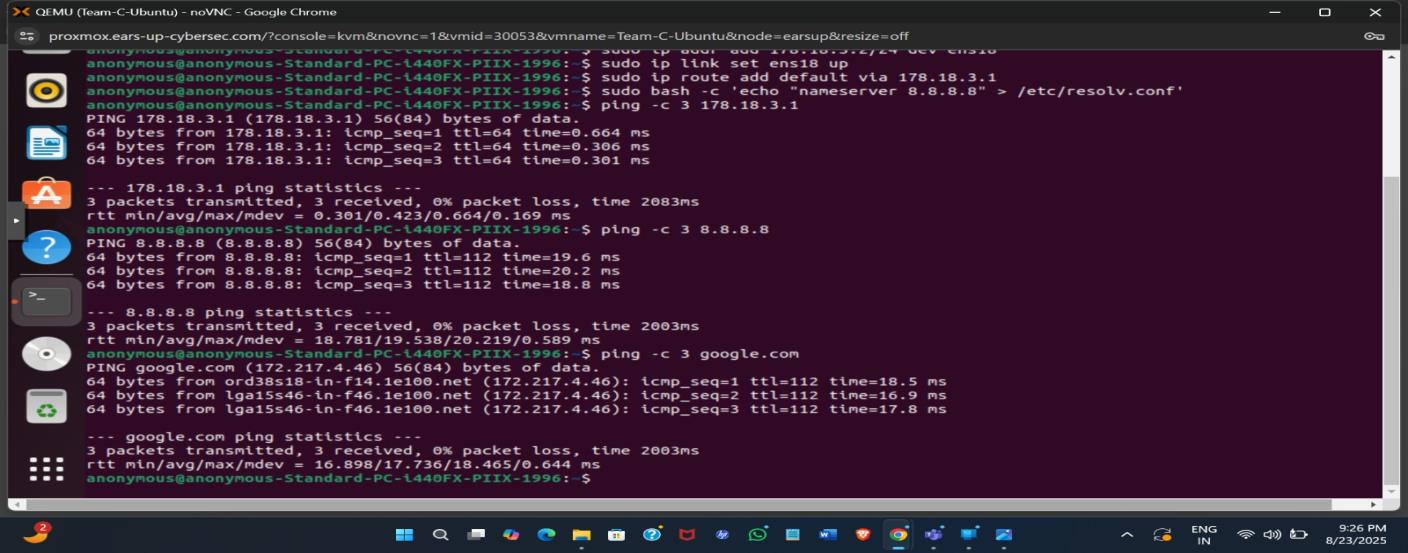
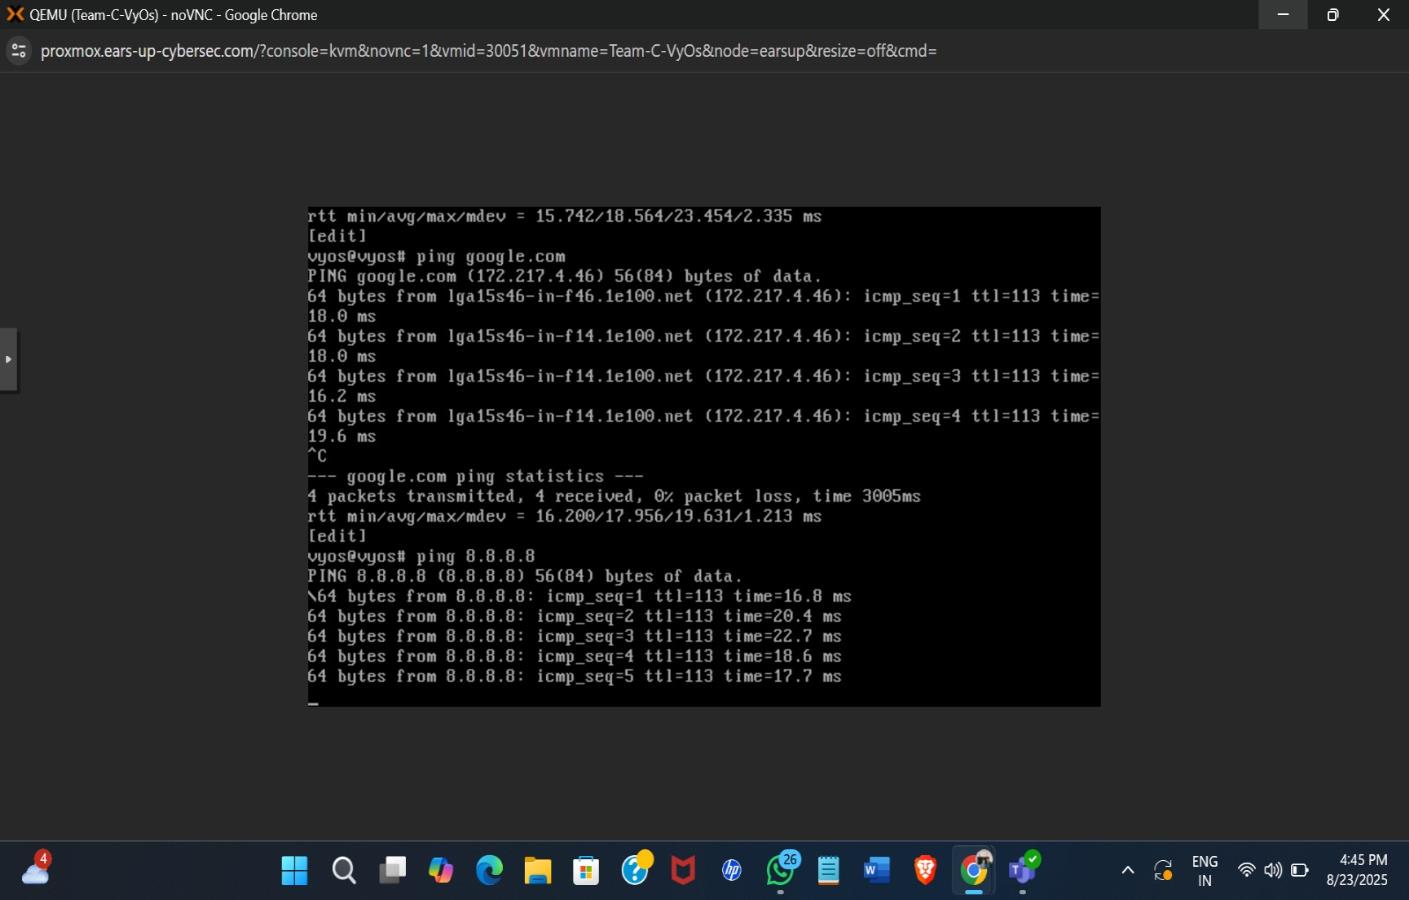 Testing VyOS router connectivity - successfully pinging google.com and 8.8.8.8
Once configured, we could ping external servers, which meant our routing was working correctly.
Deploying the Firewall: pfSense
pfSense became our security gateway, protecting the internal network (192.168.102.0/24). It's a powerful firewall with a web-based GUI that makes rule management much easier than command-line alternatives.
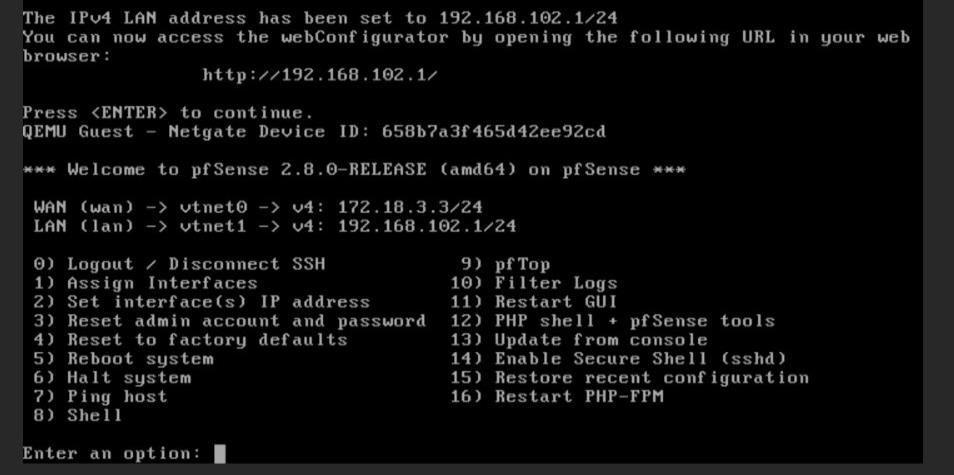 pfSense console showing LAN IP configuration (192.168.102.1/24)
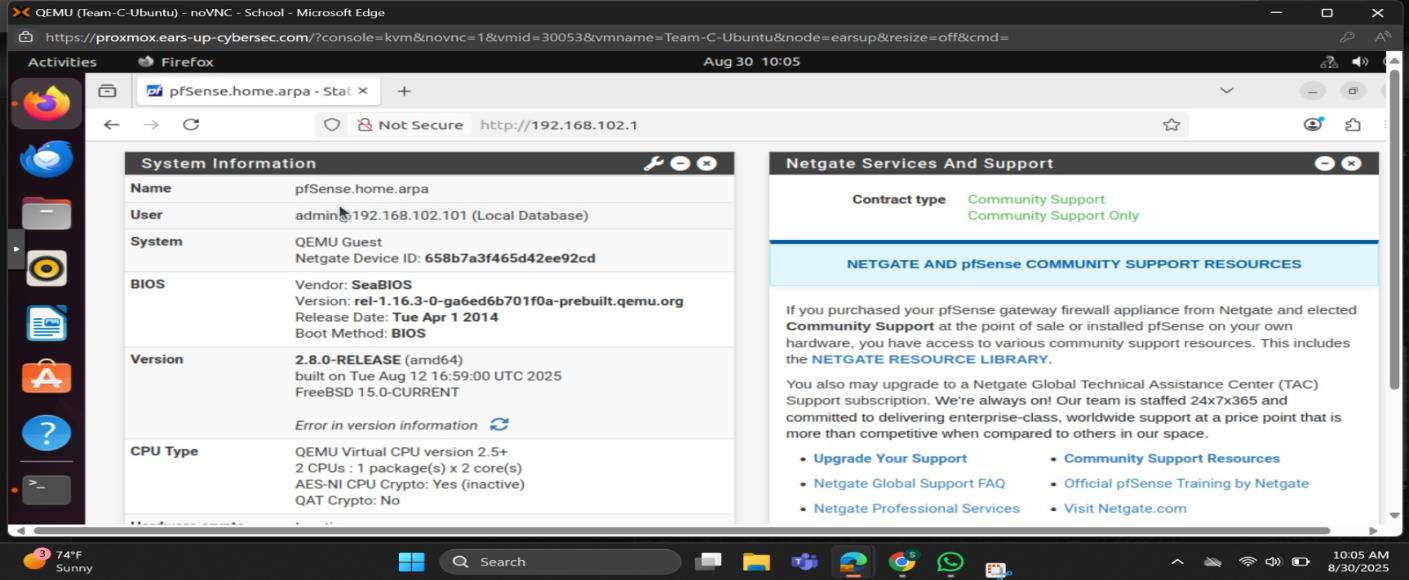 pfSense web GUI showing System Information - version 2.8.0-RELEASE running on QEMU Guest system
The firewall rules were critical. We needed to allow specific traffic while blocking everything else:
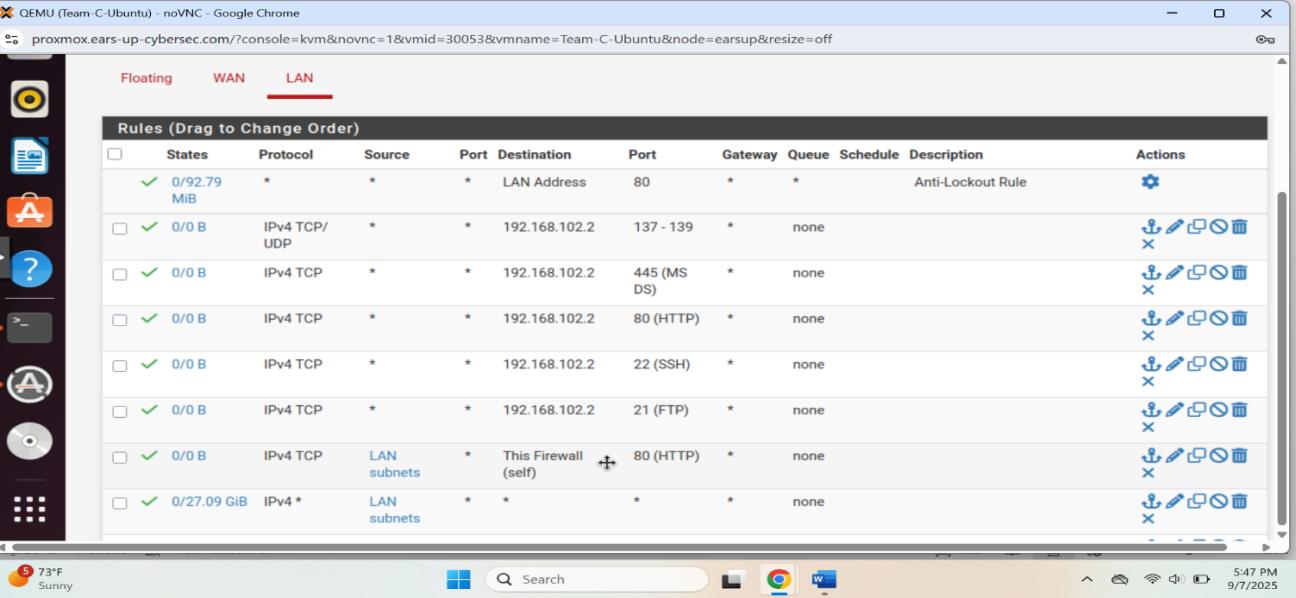 pfSense LAN firewall rules controlling traffic to ports 22 (SSH), 21 (FTP), 80 (HTTP), and 445 (MS-DS)
Setting Up the Windows Workstation
Our Windows 10 machine needed to be configured as a typical enterprise endpoint. This meant static IP configuration, proper gateway settings, and connectivity testing.
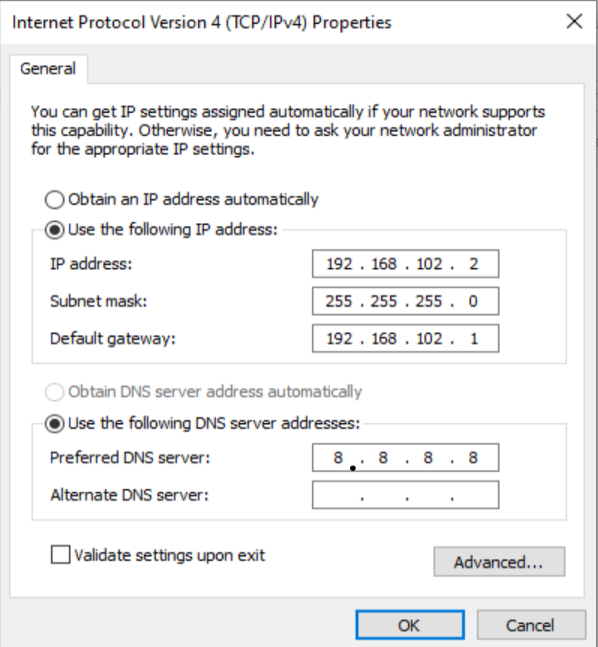 Setting static IP (192.168.102.2) on Windows 10
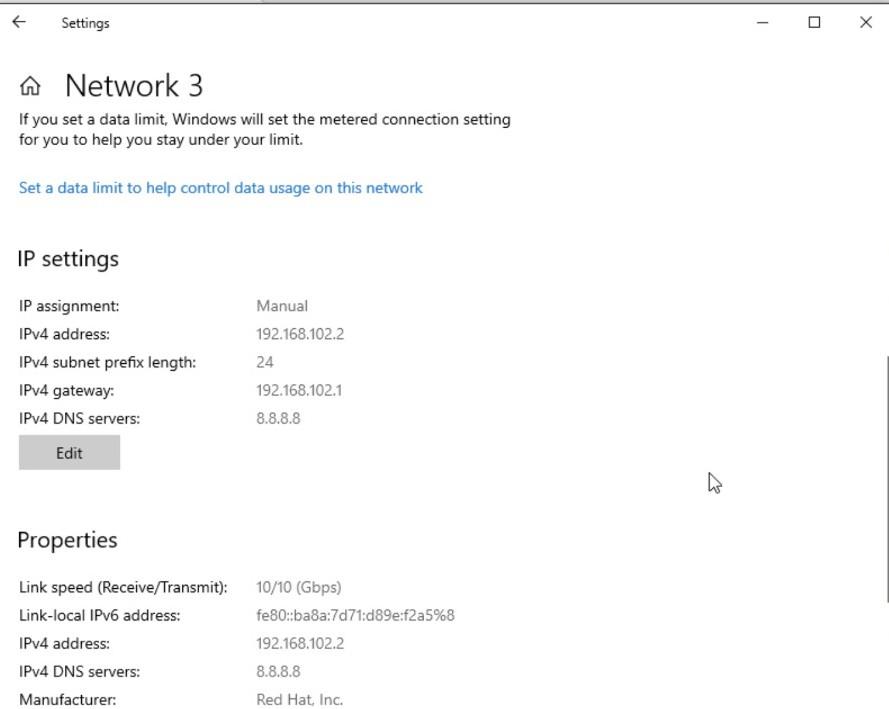 Windows network settings showing IP 192.168.102.2 and gateway 192.168.102.1
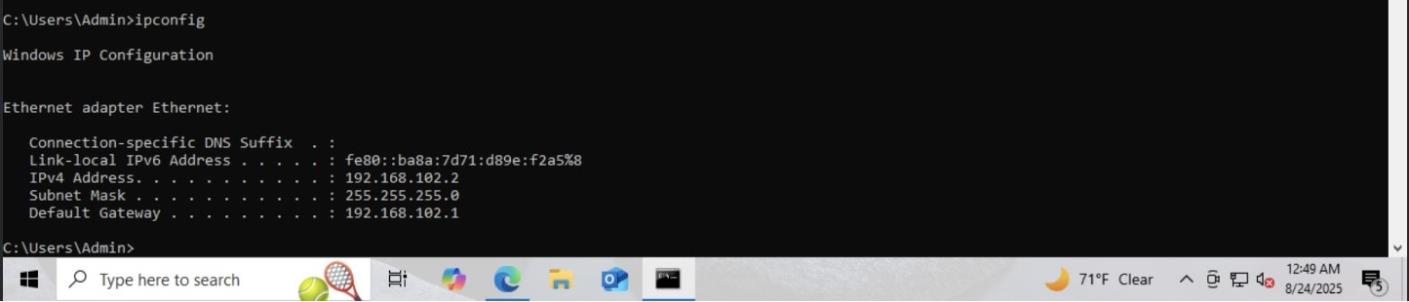 ipconfig output confirming the static IP configuration
Once configured, we tested connectivity to make sure everything was working:
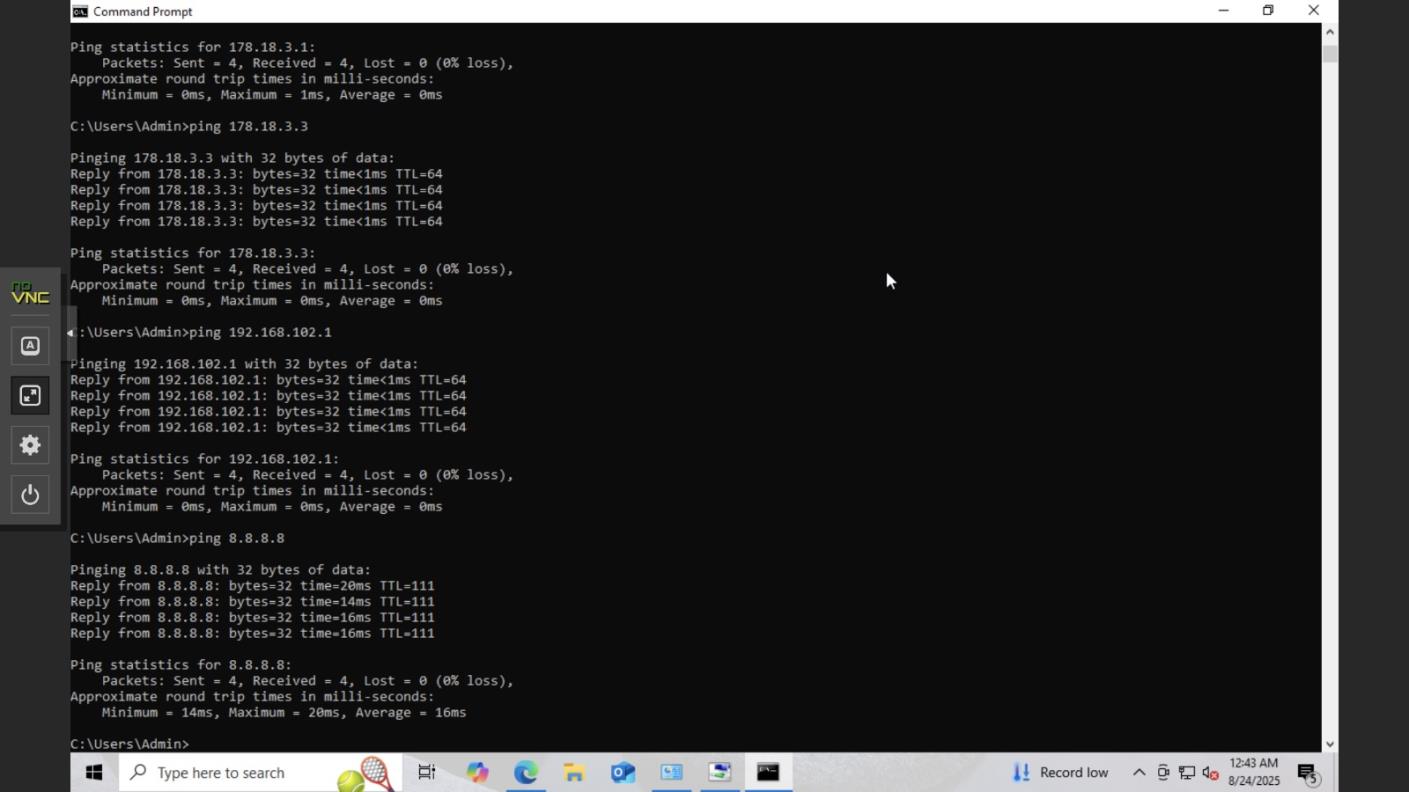 Windows pinging gateway (192.168.102.1), pfSense WAN (178.18.3.3), router (178.18.3.1), and internet (8.8.8.8)
Ubuntu Server: The Security Monitoring Hub
Ubuntu would host our security monitoring infrastructure. Getting the network configuration right here was essential since Wazuh needed to communicate with all endpoints.
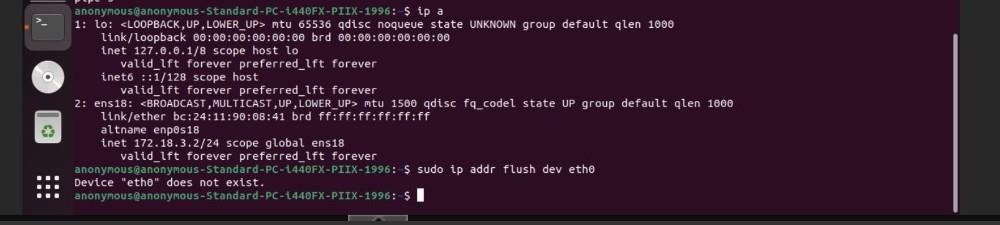 Ubuntu terminal showing ip addr flush command to clear old network configuration
 Configuring Ubuntu interface ens18, setting default gateway, DNS, and testing connectivity to 178.18.3.1, 8.8.8.8, and google.com
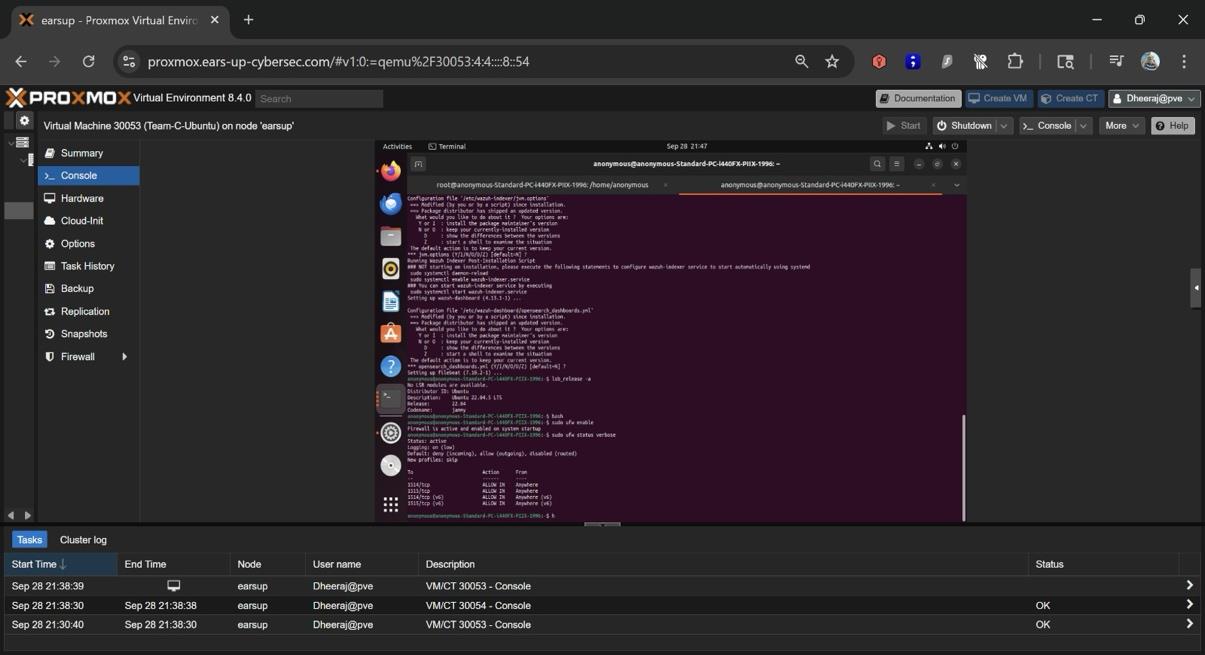
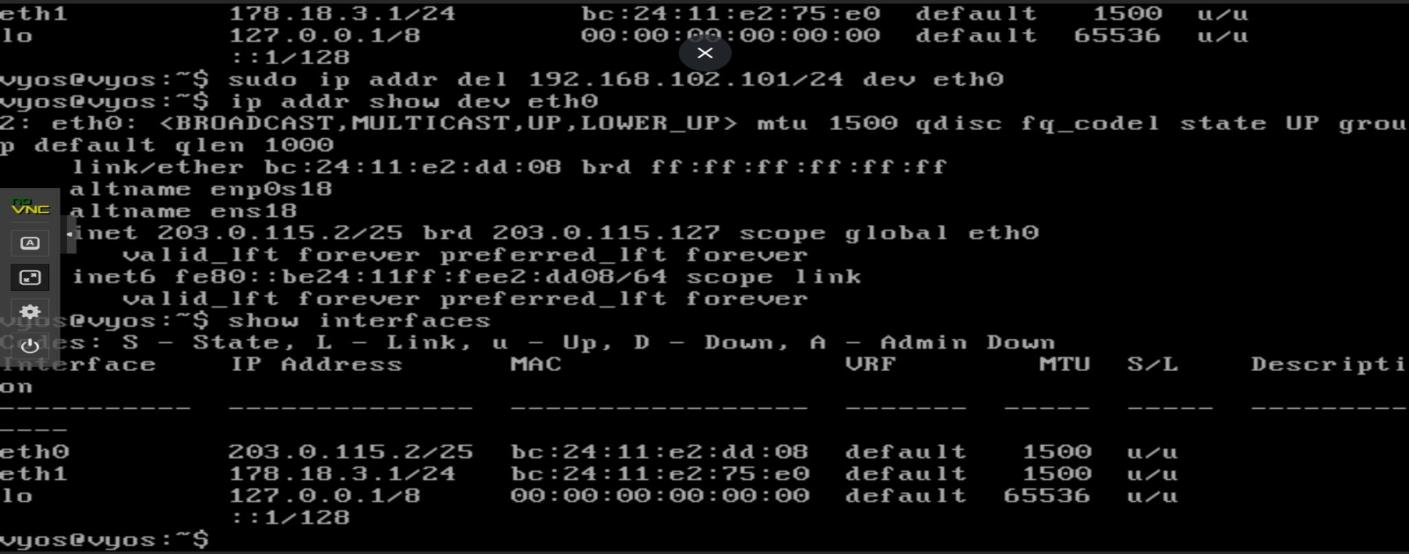 Ubuntu terminal session showing system configuration commands
Security Monitoring: Wazuh & Sysmon
Deploying Wazuh SIEM
Wazuh is an open-source SIEM that collects and analyzes security logs from all endpoints. We deployed it on the Ubuntu server, and it became our central nervous system for security monitoring.
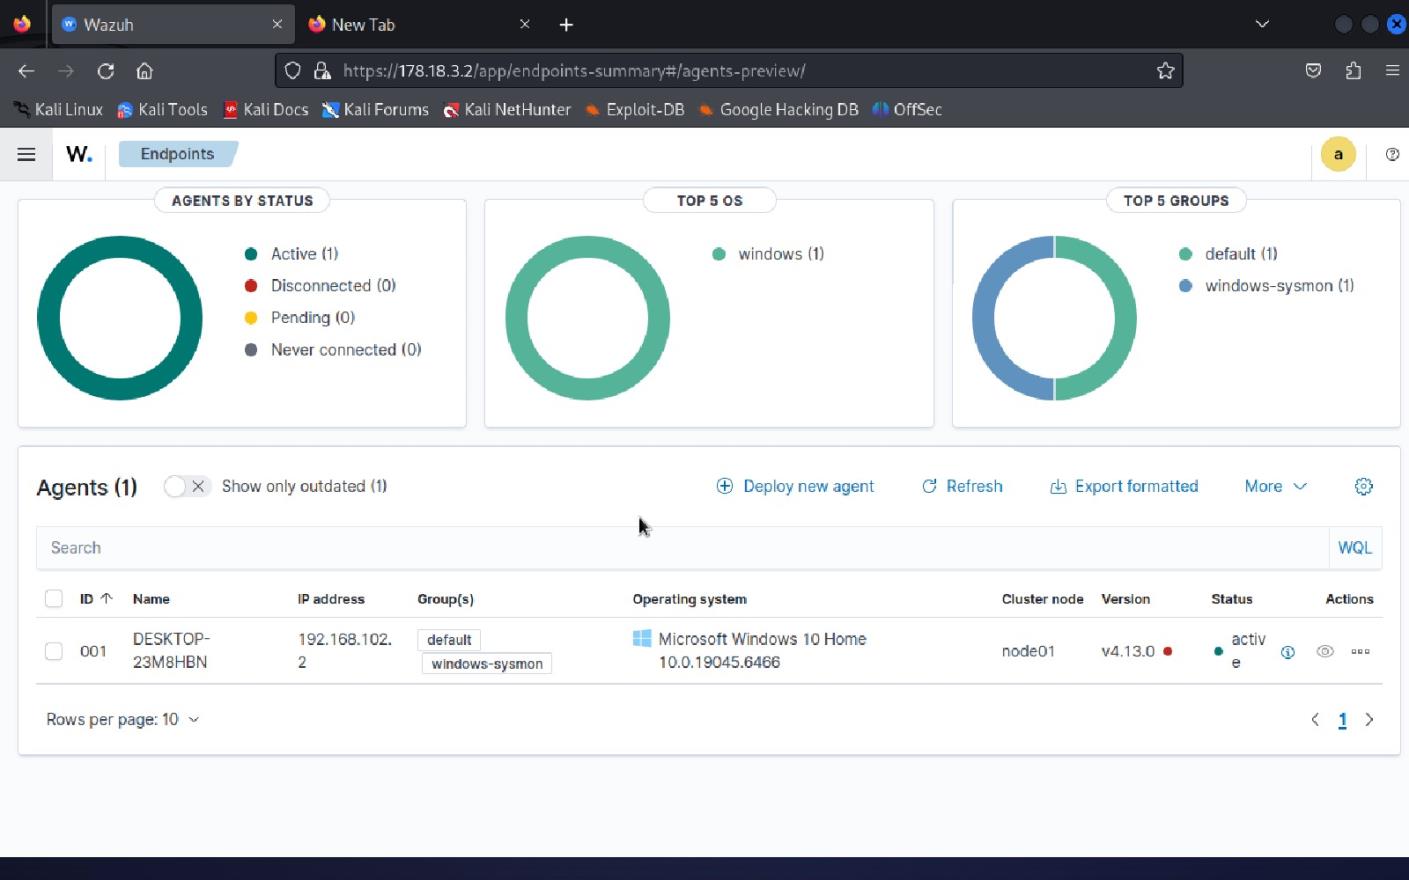
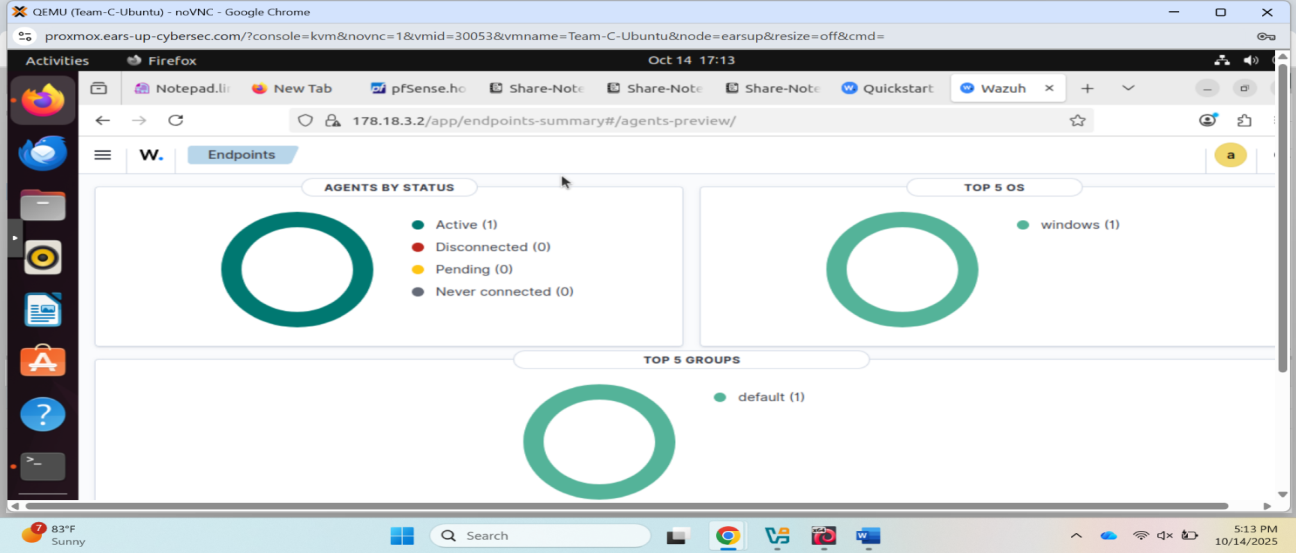 Wazuh dashboard showing 1 active agent (Windows machine at 192.168.102.2)
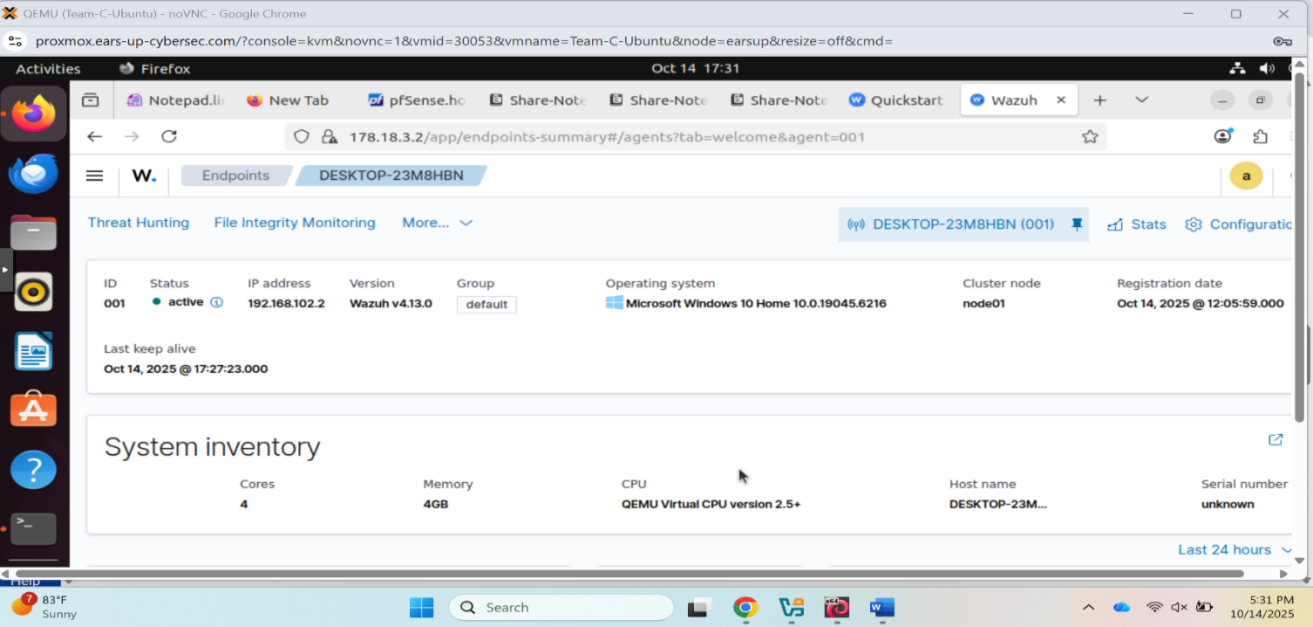 Wazuh agent details - DESKTOP-23M8HBN running Windows 10 Home
To allow Wazuh traffic, we had to configure firewall rules:
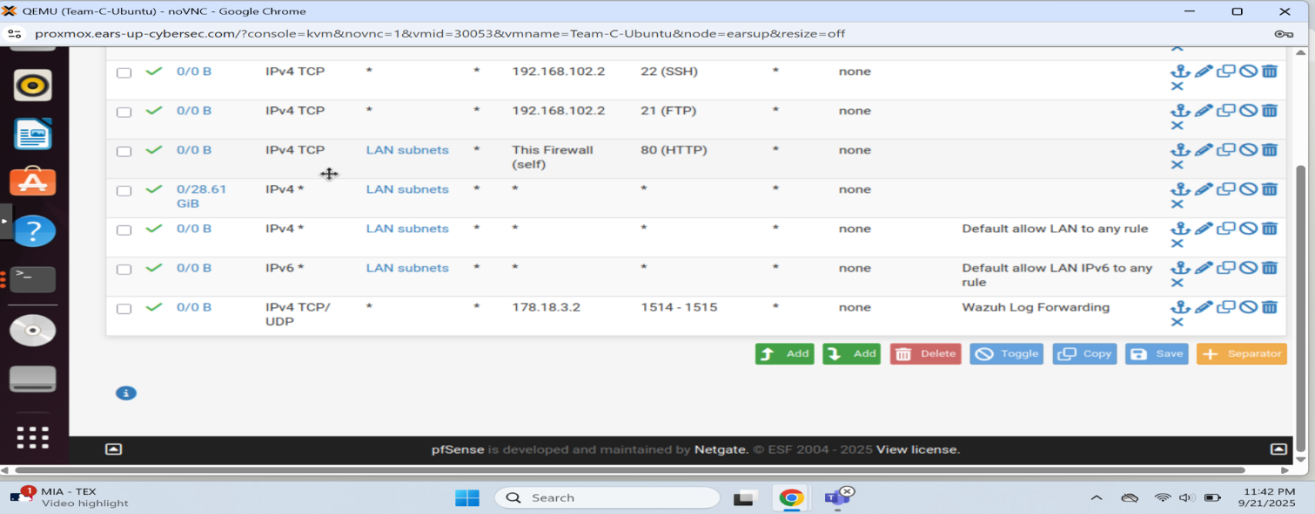 pfSense firewall rules allowing Wazuh traffic on ports 1514-1515
Installing Sysmon on Windows
Sysmon (System Monitor) captures detailed system events on Windows endpoints. It's incredibly powerful for detecting suspicious activity, but getting it configured correctly took some time.
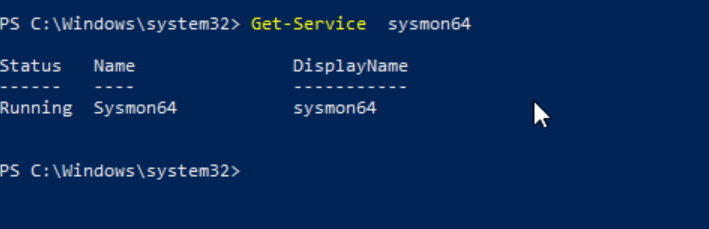 Verifying Sysmon64 service is running on Windows
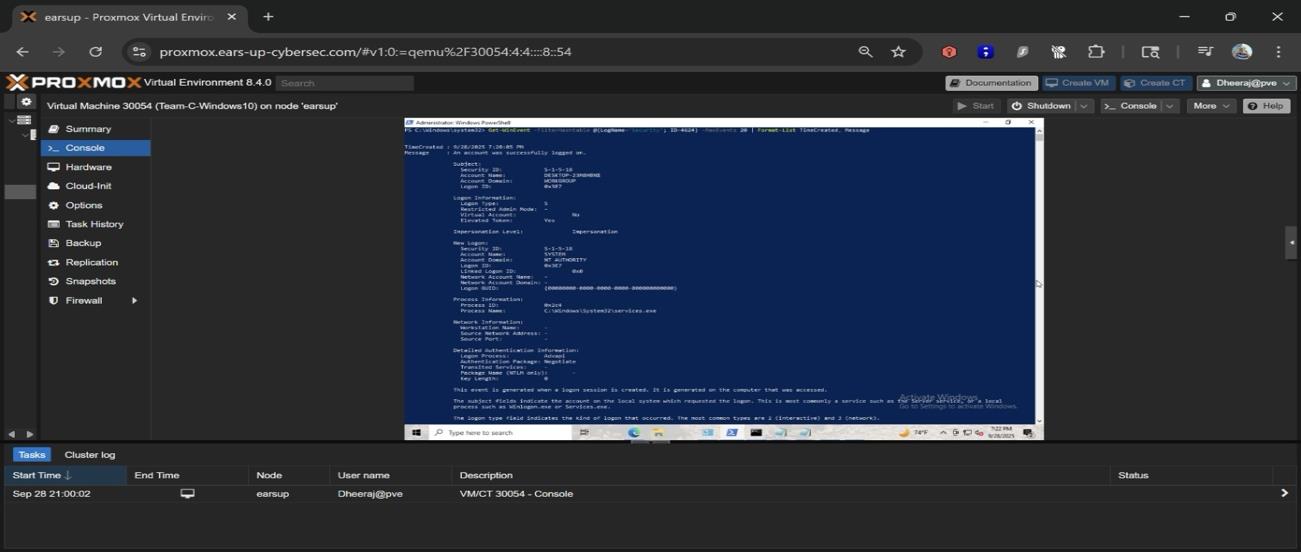
 Windows Event Viewer showing Sysmon operational logs capturing process creation events
We configured Sysmon using a custom XML configuration file from SwiftOnSecurity's GitHub repository, which provides excellent default rules for detecting common attack techniques.
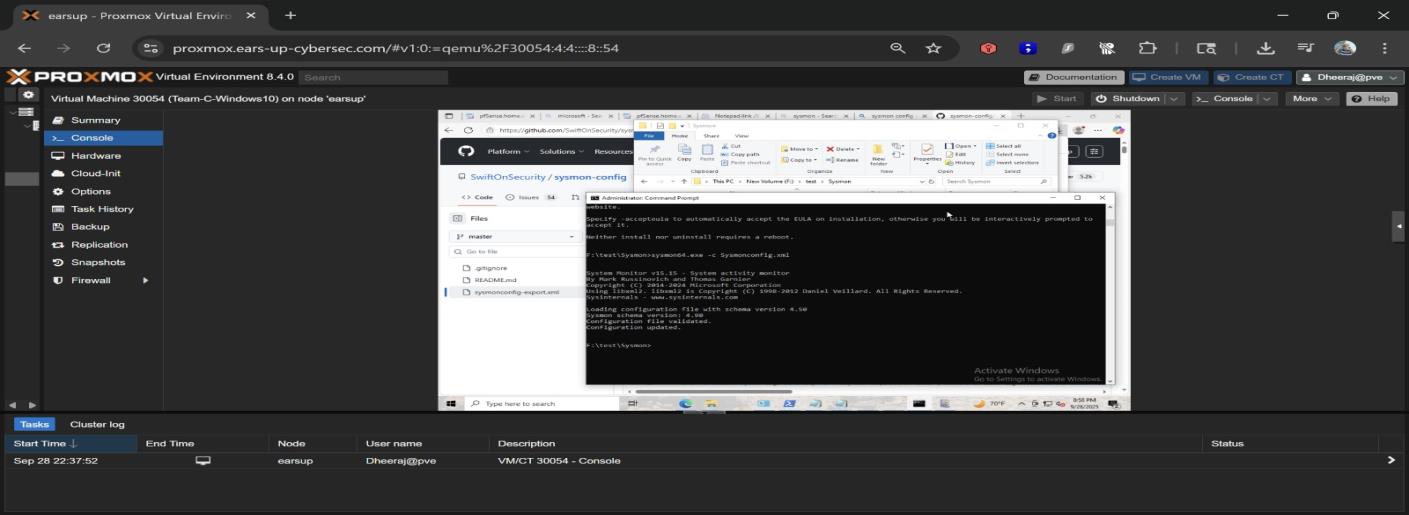 Viewing Sysmon configuration from SwiftOnSecurity GitHub repository
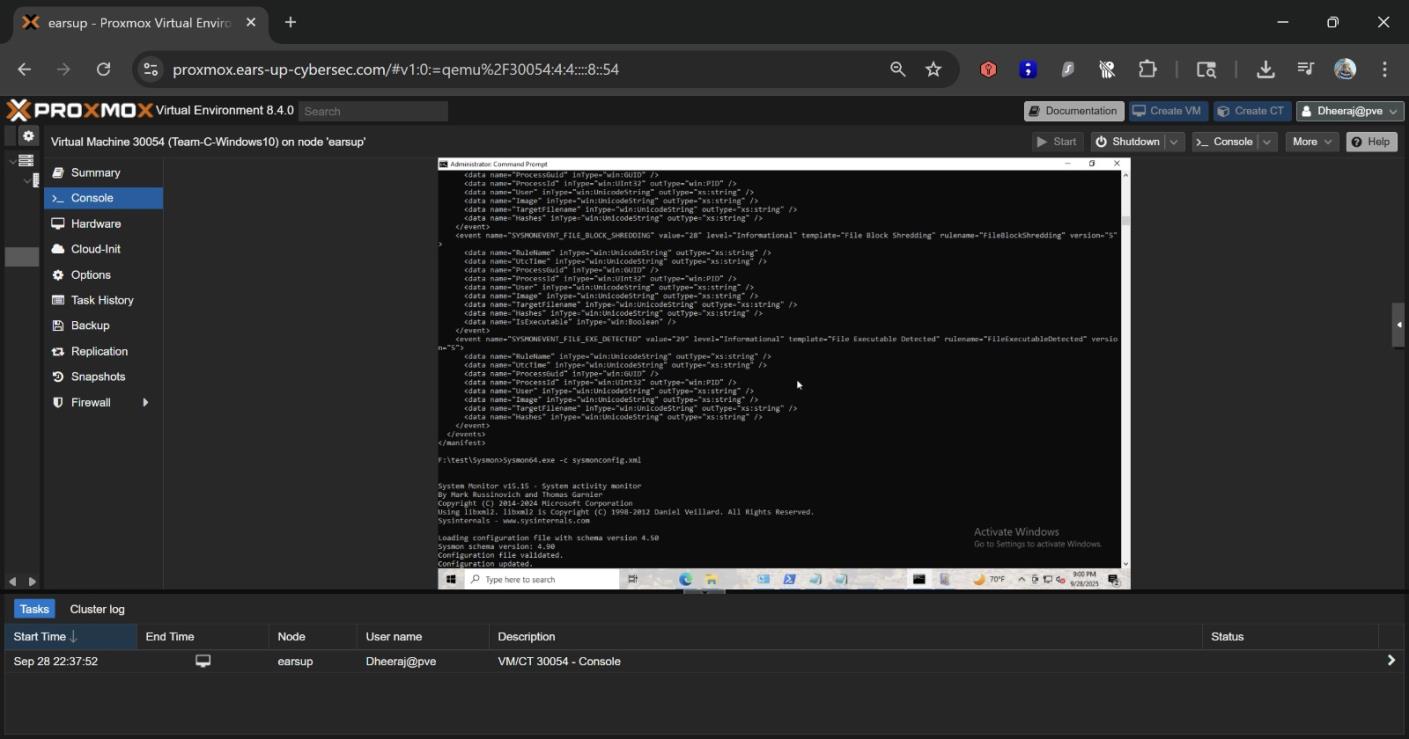 Sysmon XML configuration file content
Seeing Security Events in Real-Time
Once everything was configured, Wazuh began capturing security events in real-time. It was exciting to see the dashboard light up with activity:
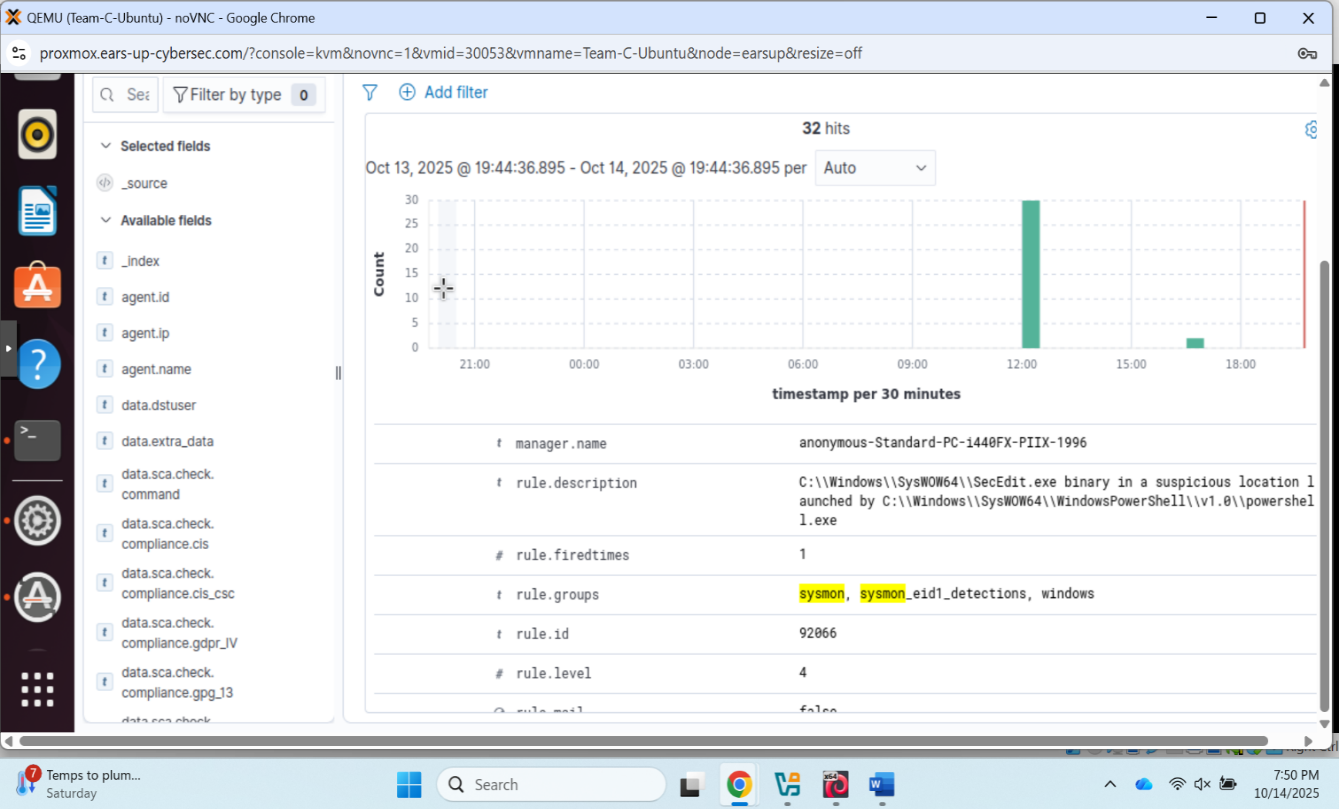 Wazuh dashboard showing 32 security events with detailed alert information
Hardening Our Systems
Before the Red vs Blue exercise began, we hardened our systems to establish a security baseline. This included:
- Windows Defender configuration
- Ubuntu firewall rules
- Disabling unnecessary services
- Applying security best practices
 Windows Defender and security hardening configurations
 Ubuntu security hardening settings and firewall configuration
Setting Up WireGuard VPN
For secure remote management, we set up WireGuard VPN. It's fast, modern, and much simpler to configure than traditional VPN solutions.
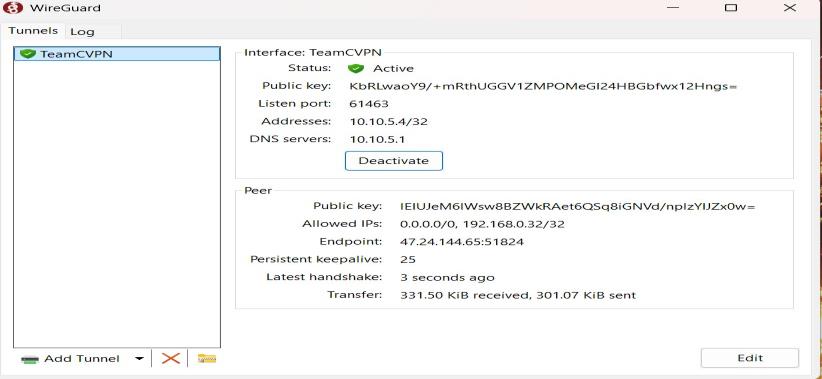 WireGuard VPN showing active tunnel with peer connection
 Testing connectivity through the VPN tunnel
Red Team Operations: Attacking the Rival Network
Now for the fun part: attacking a rival team's network (192.168.26.6). As the Red Team, our goal was to identify vulnerabilities and see how far we could get.
Finding 1: SMB Access Achieved
We started with SMB enumeration and quickly discovered we could access multiple shares. This was a significant finding: SMB shares often contain sensitive data.
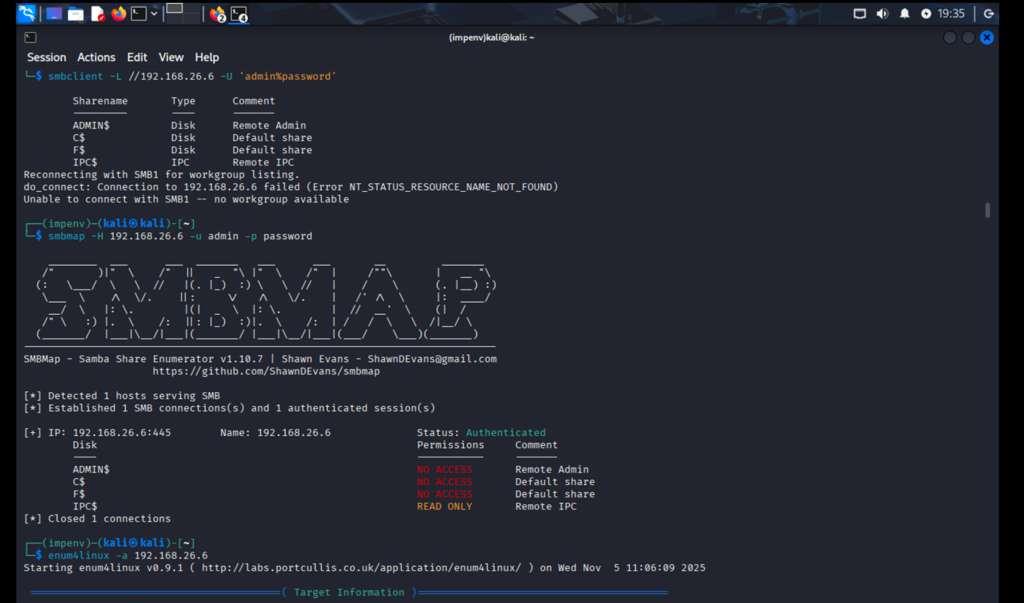 Using smbmap tool to enumerate SMB shares on 192.168.26.6 - discovered ADMIN$, C$, F$, IPC$ shares
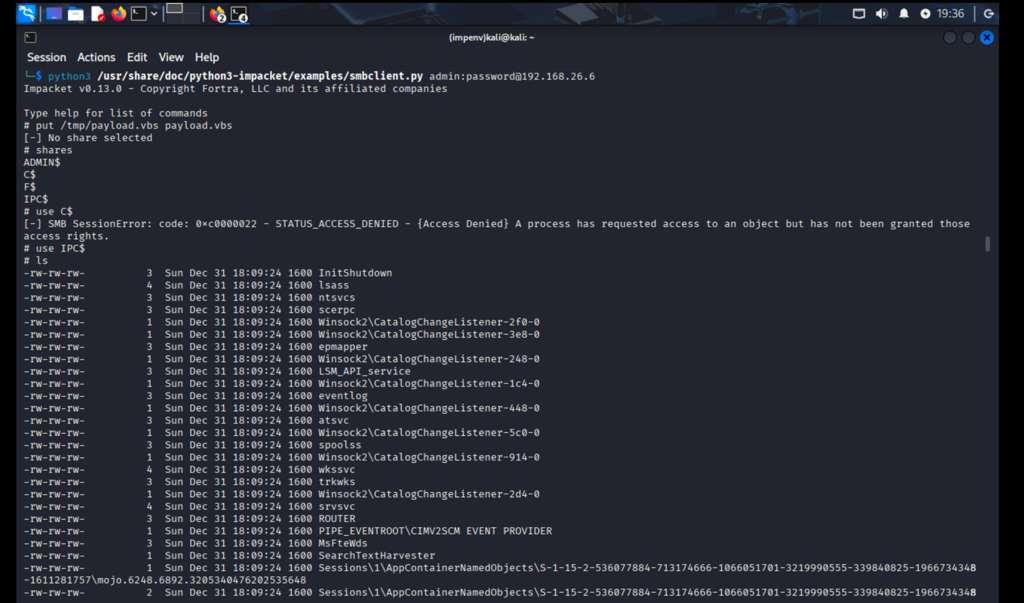 Using Impacket smbclient.py to browse and list files within the SMB shares
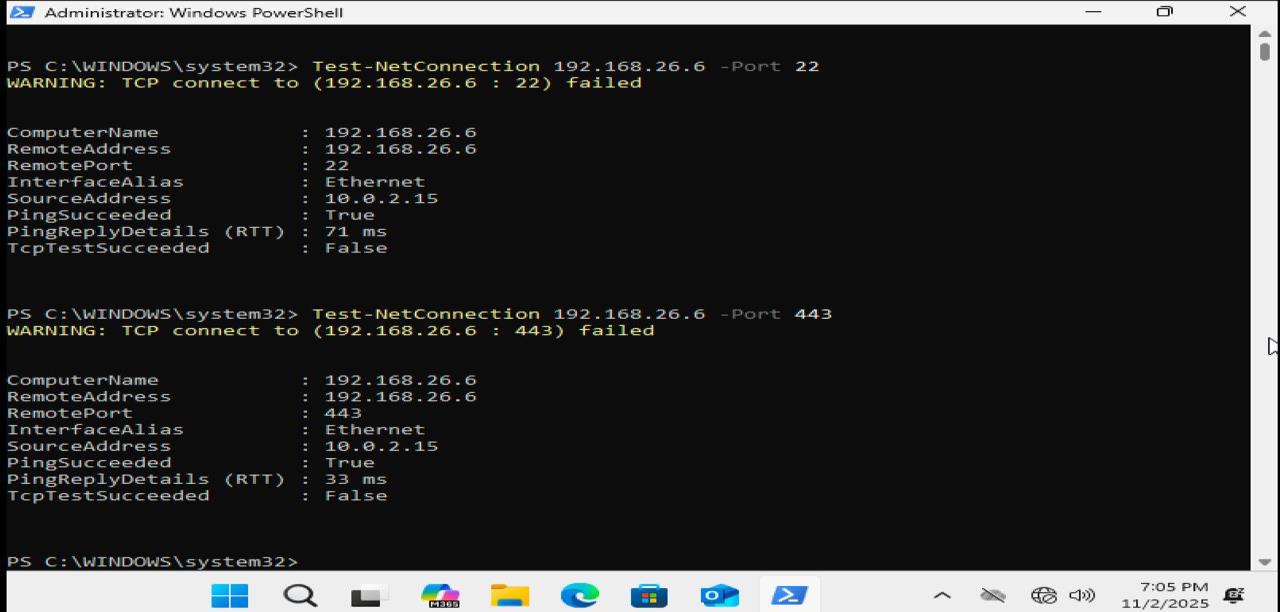
Finding 2: Testing Target Reachability
Before diving deep, we verified the target was accessible and tested which ports responded:
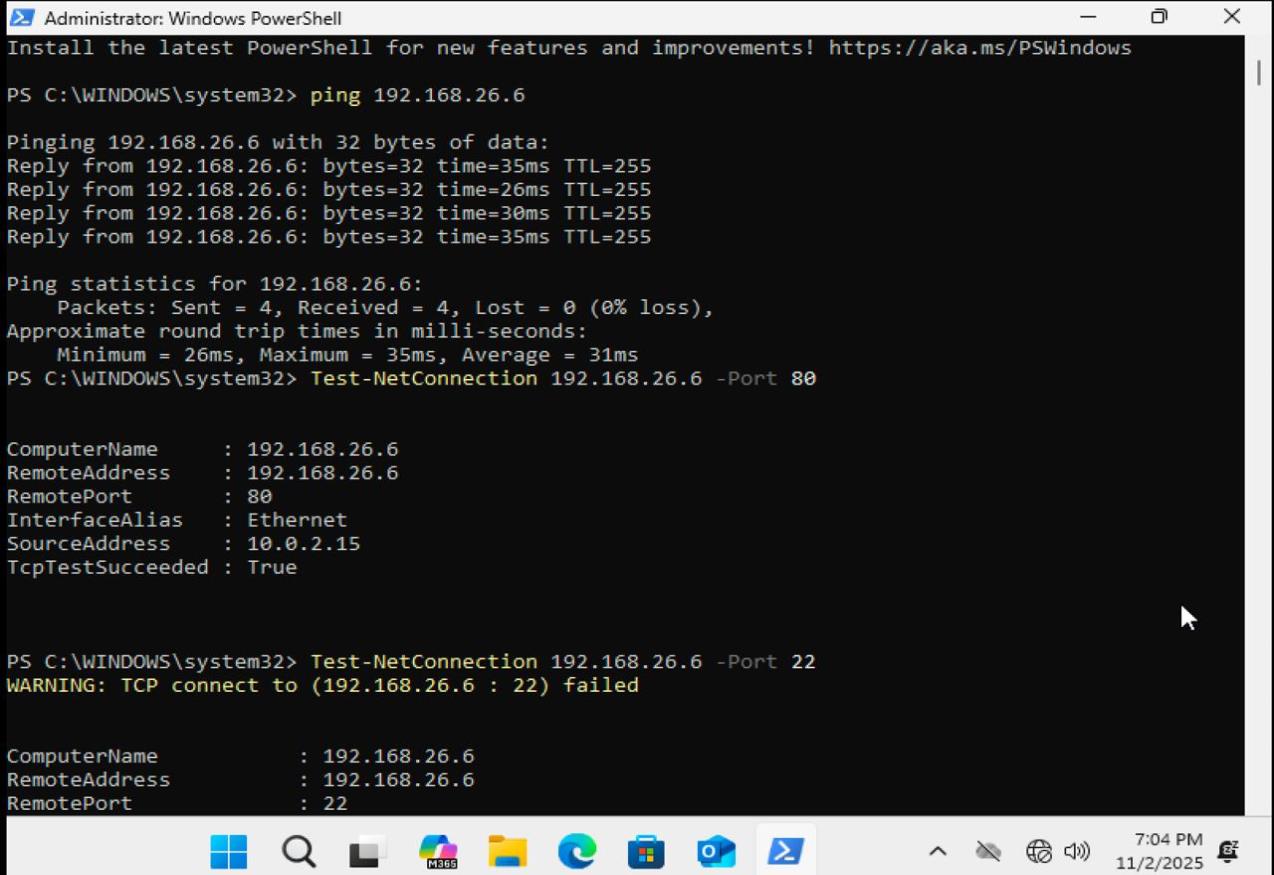 PowerShell connectivity tests showing ping to 192.168.26.6 successful, port 80 open, port 22 closed
Finding 3: IIS Web Server with Default Configuration
The target was running IIS with default settings, a classic mistake. Default configurations are often insecure, and this was no exception.
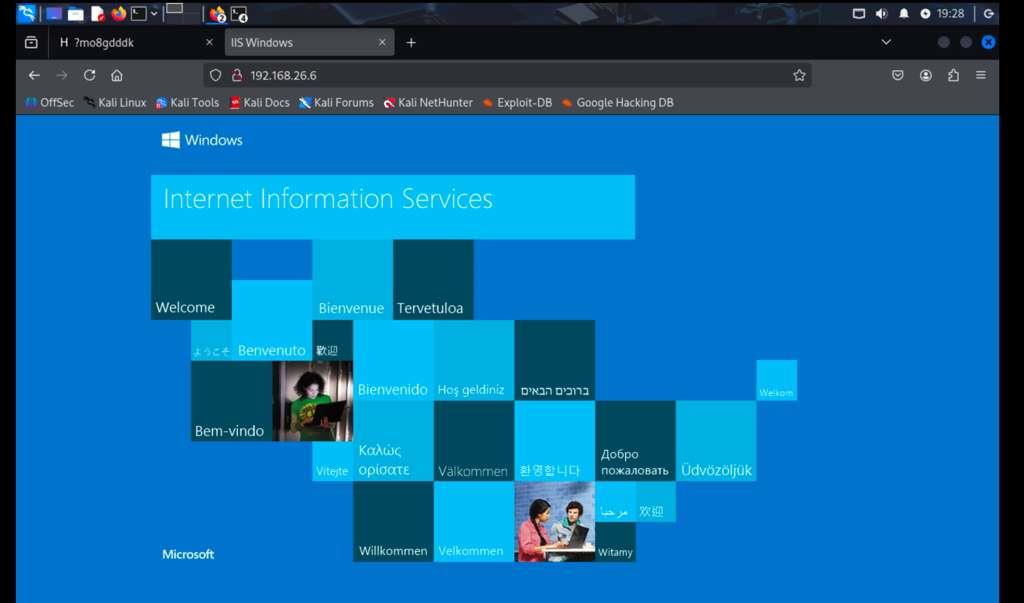 Accessing the default IIS "Internet Information Services" welcome page from Kali
Finding 4: Network Service Scanning
Nmap revealed multiple open services that increased the attack surface significantly:
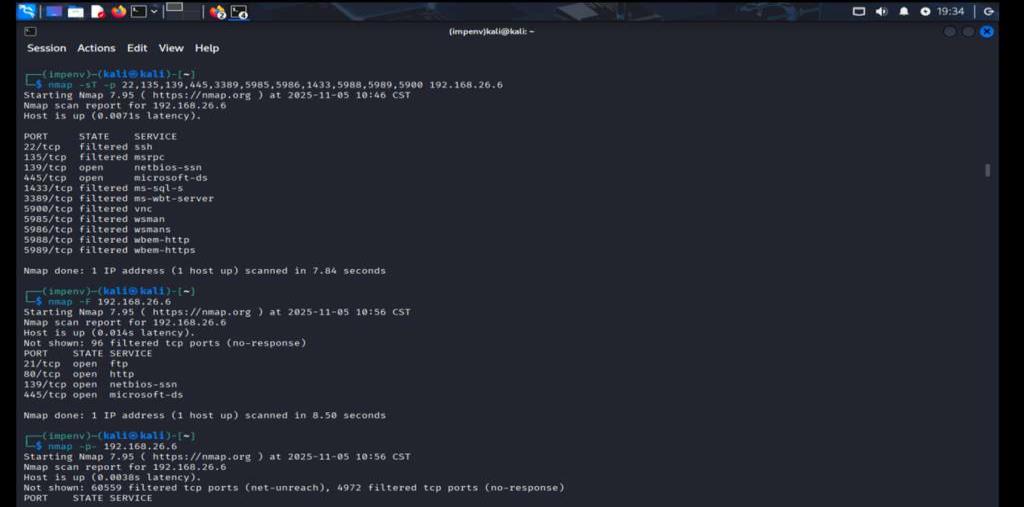 Nmap scan showing multiple open ports on 192.168.26.6
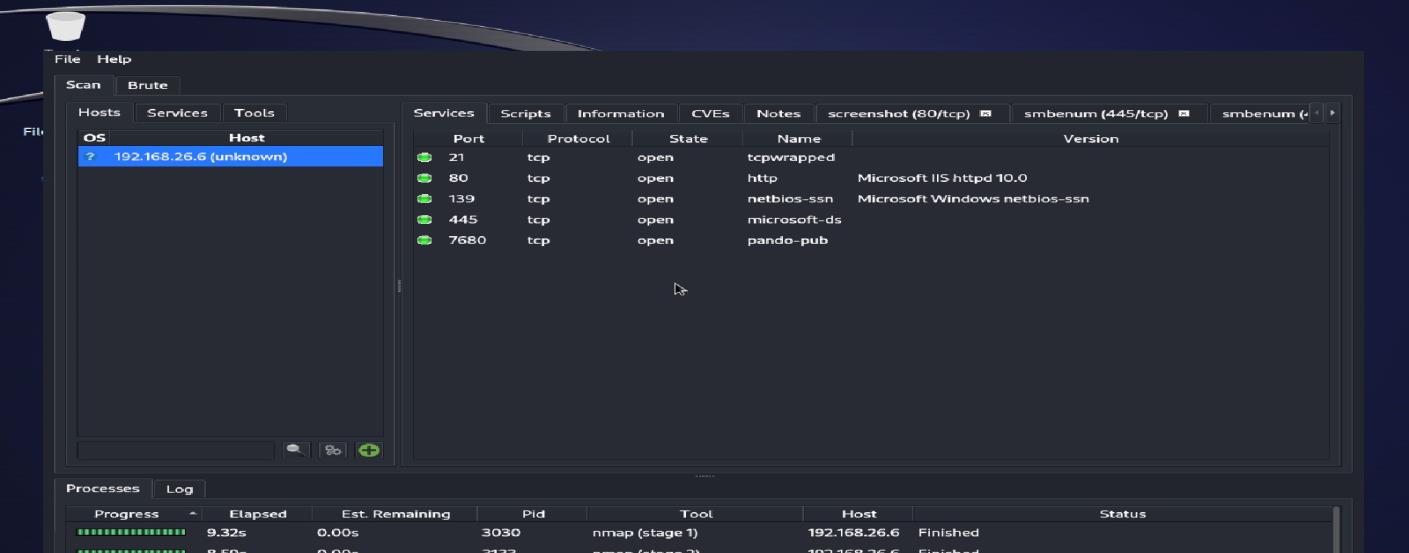 Detailed Nmap service version scan revealing HTTP, NetBIOS, and Microsoft-ds
Finding 5: SMB Brute Force Attempt
We attempted brute force attacks against the SMB service using Metasploit. However, account lockout policies prevented us from gaining access this way:
 Metasploit smb_login module attempting brute force - all attempts failed due to account lockout
Finding 6: SMB Signing Disabled
This was a critical finding: SMB signing was disabled, which creates a vulnerability to man-in-the-middle attacks:
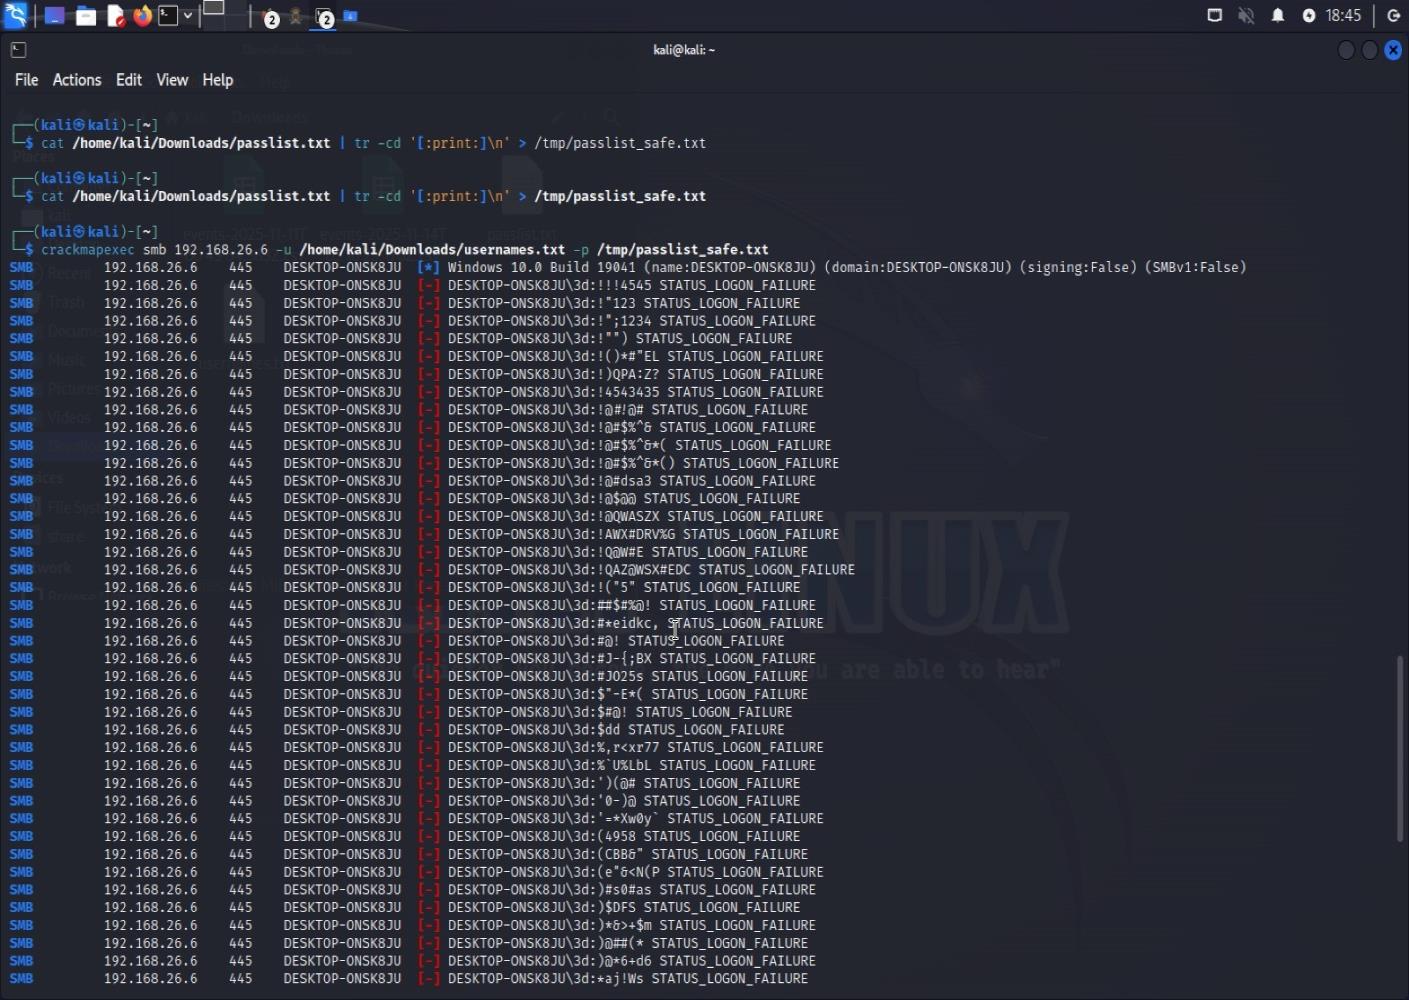 CrackMapExec showing SMB signing is disabled (Signing:False)
Finding 7: RPC Information Disclosure
We used rpcclient to extract system information without full authentication. This is a common information disclosure vulnerability:
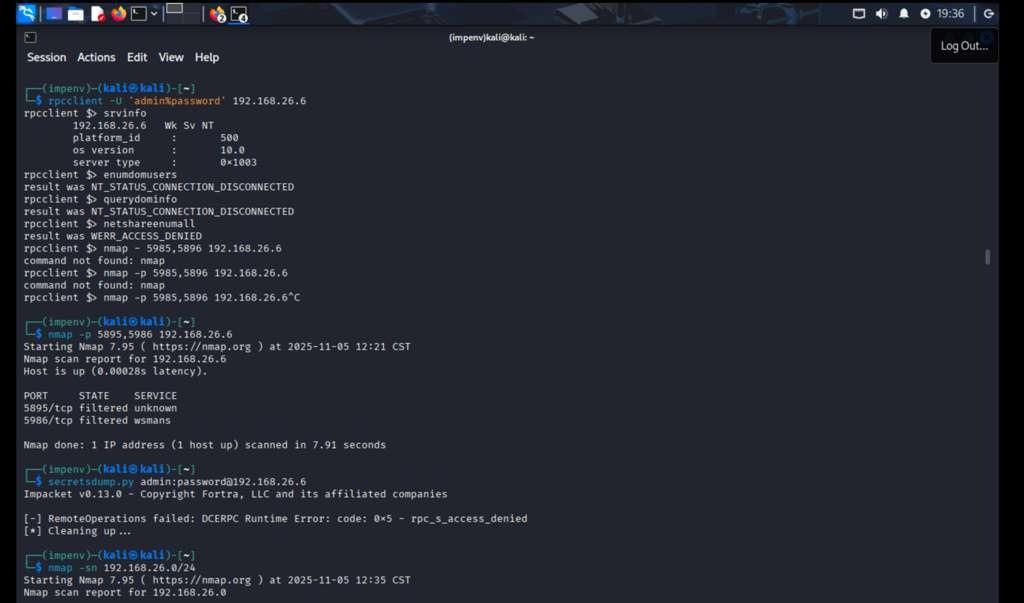 Using rpcclient to query system information via RPC
Finding 8: FTP on Non-Standard Port 123
One of the most interesting findings was an FTP server running on port 123 (typically used for NTP). Security by obscurity doesn't work: we found it anyway.
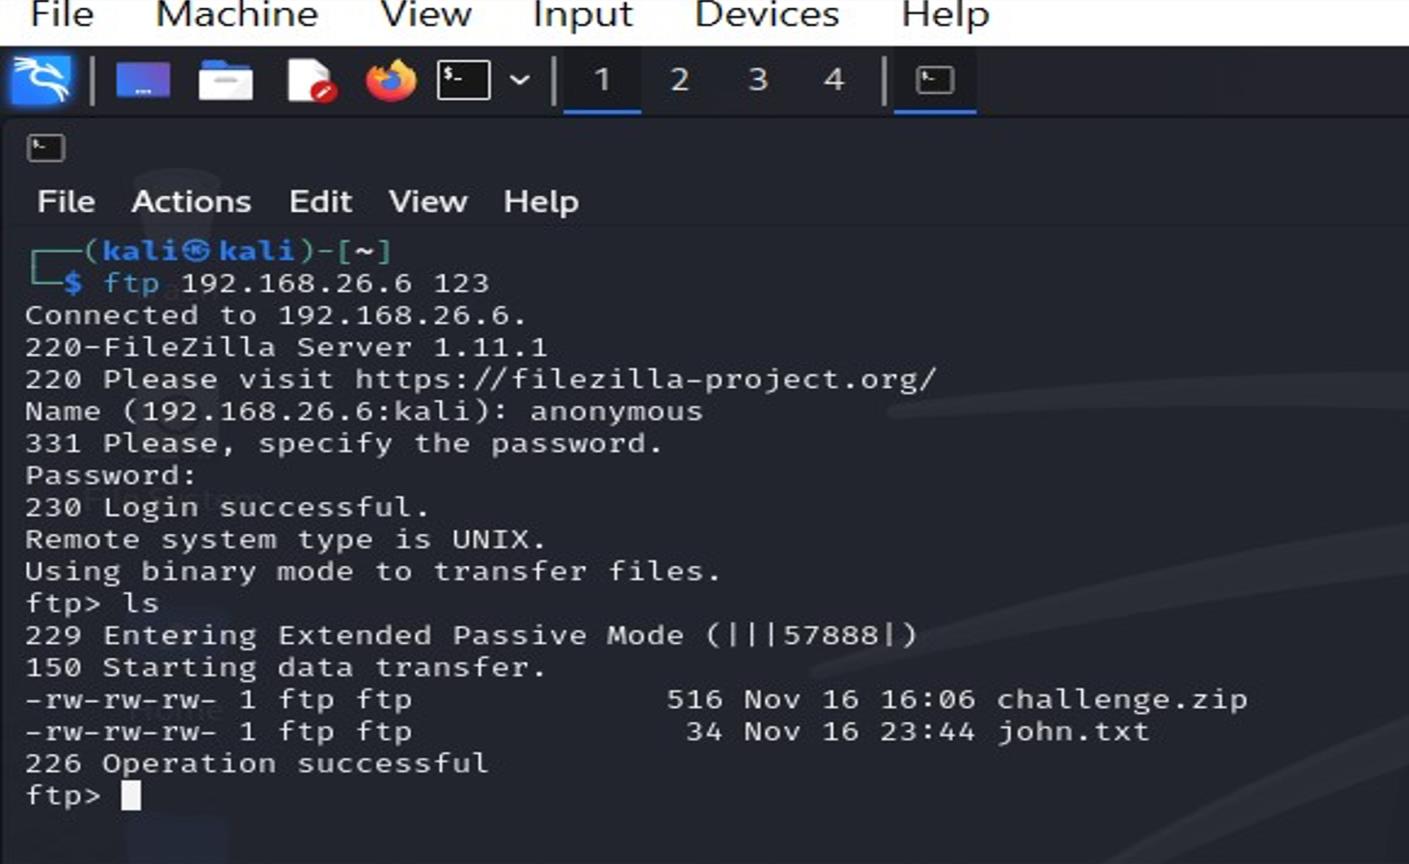 Connecting to FTP on port 123 and downloading files (challenge.zip, john.txt)
We downloaded and analyzed the files:
 Analyzing the downloaded main.c file
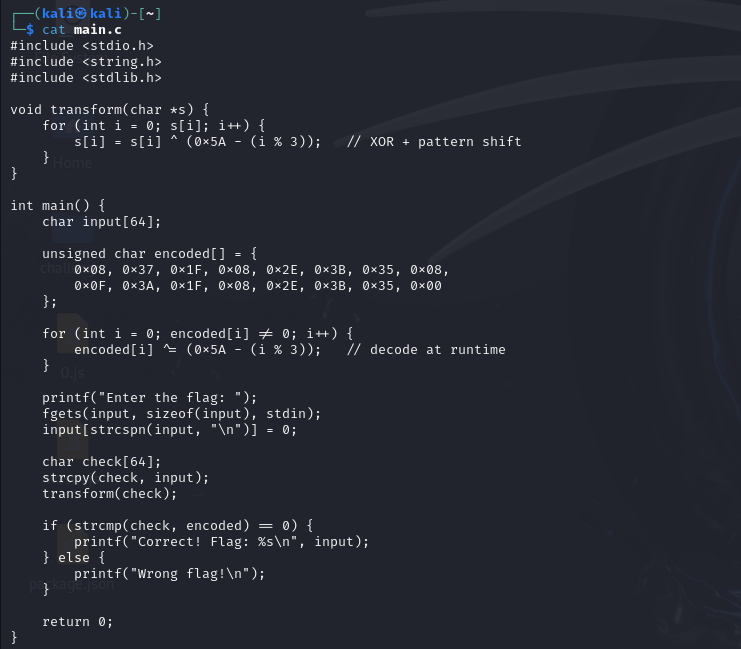 Reviewing the source code content
Blue Team Operations: Defending Our Network
While attacking the rival network, we simultaneously monitored our own infrastructure (192.168.102.2) for threats. This dual perspective was incredibly valuable: we could see both sides of the security equation.
Threat Hunting
We used Wazuh's threat hunting dashboard to actively search for indicators of compromise. This proactive approach helped us catch potential issues early:
 Wazuh threat hunting dashboard with multiple detection tabs
Analyzing Security Events
The security events captured by our monitoring system told a story. We saw command shells, SSH failures, and malware detection attempts:
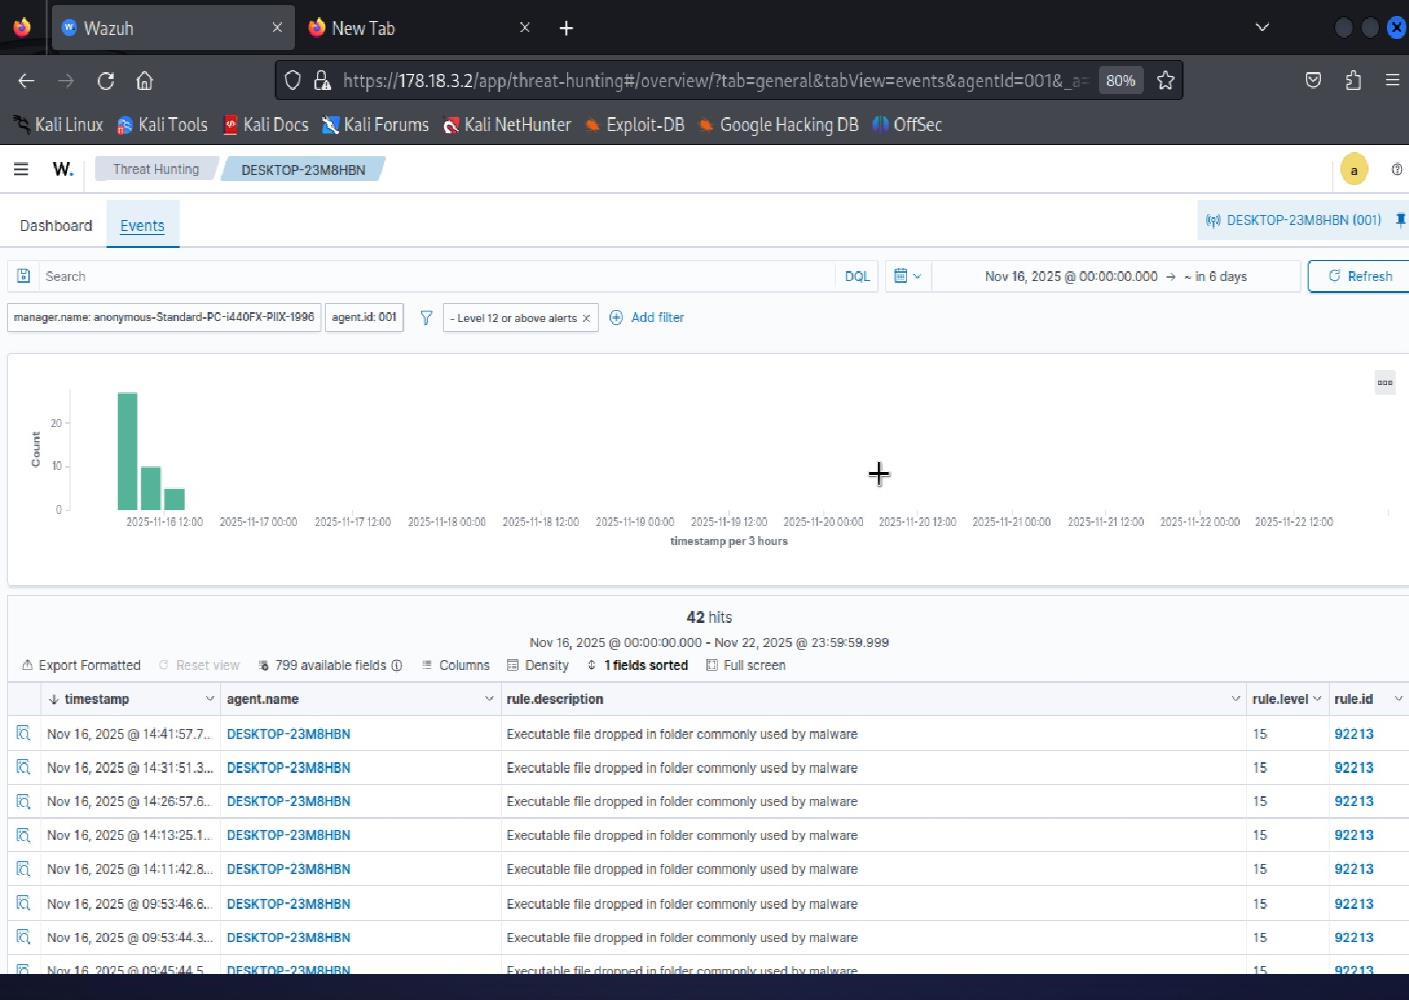 Security events log showing command shells, SSH failures, and malware detection
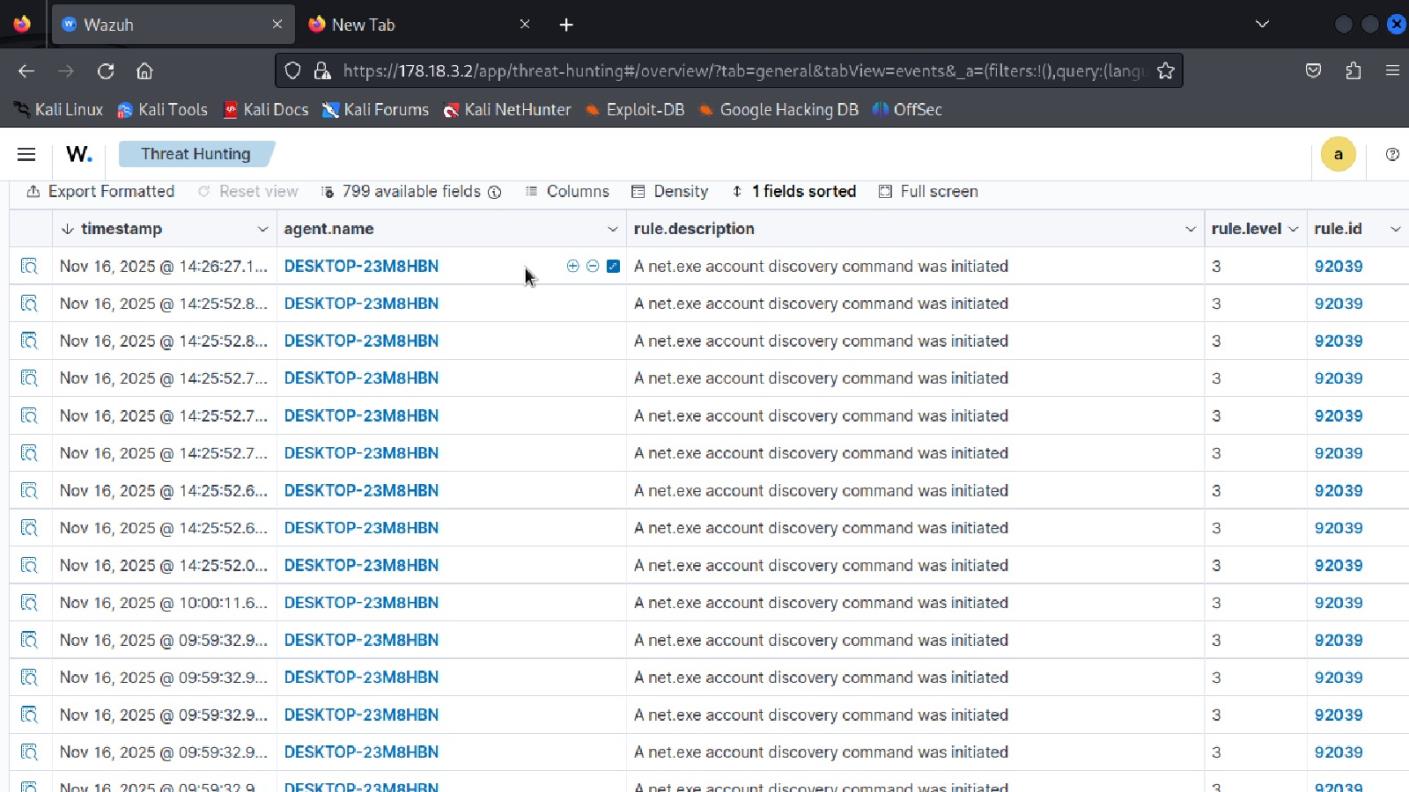
We dove deep into specific rule detections:
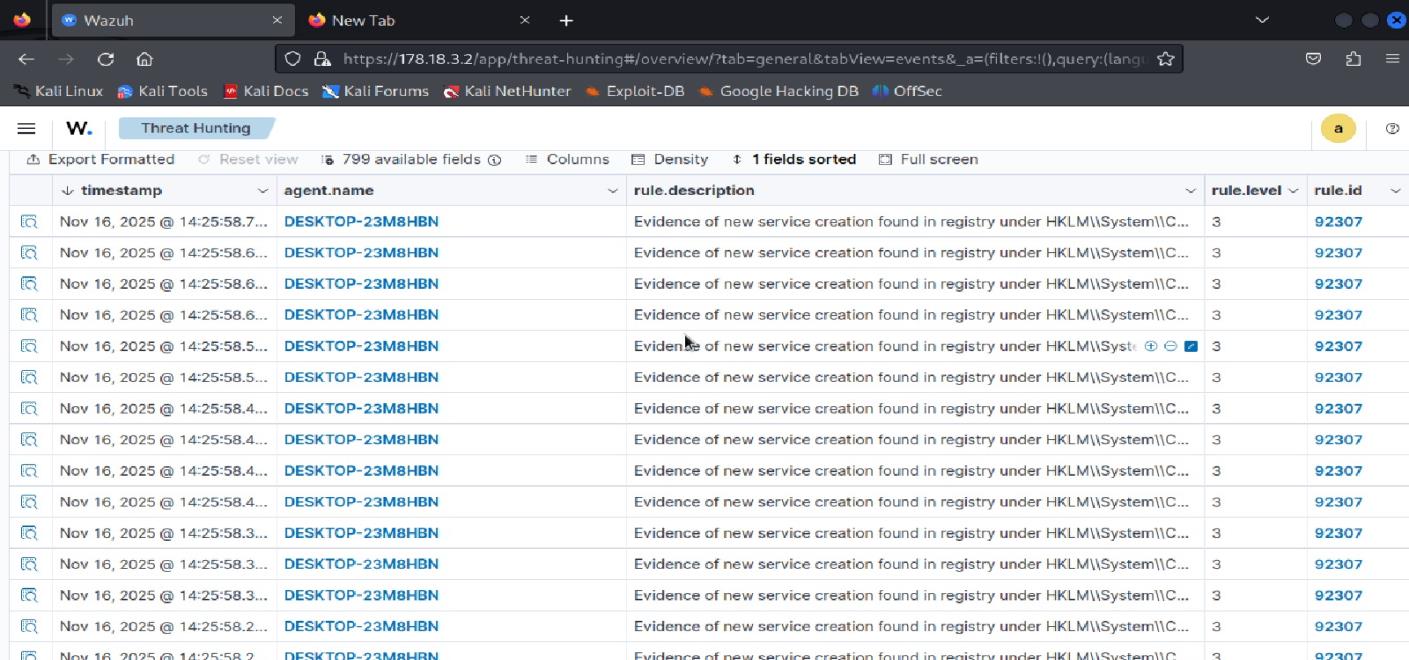 Detailed analysis of Rule ID 92307 (Service creation detection)
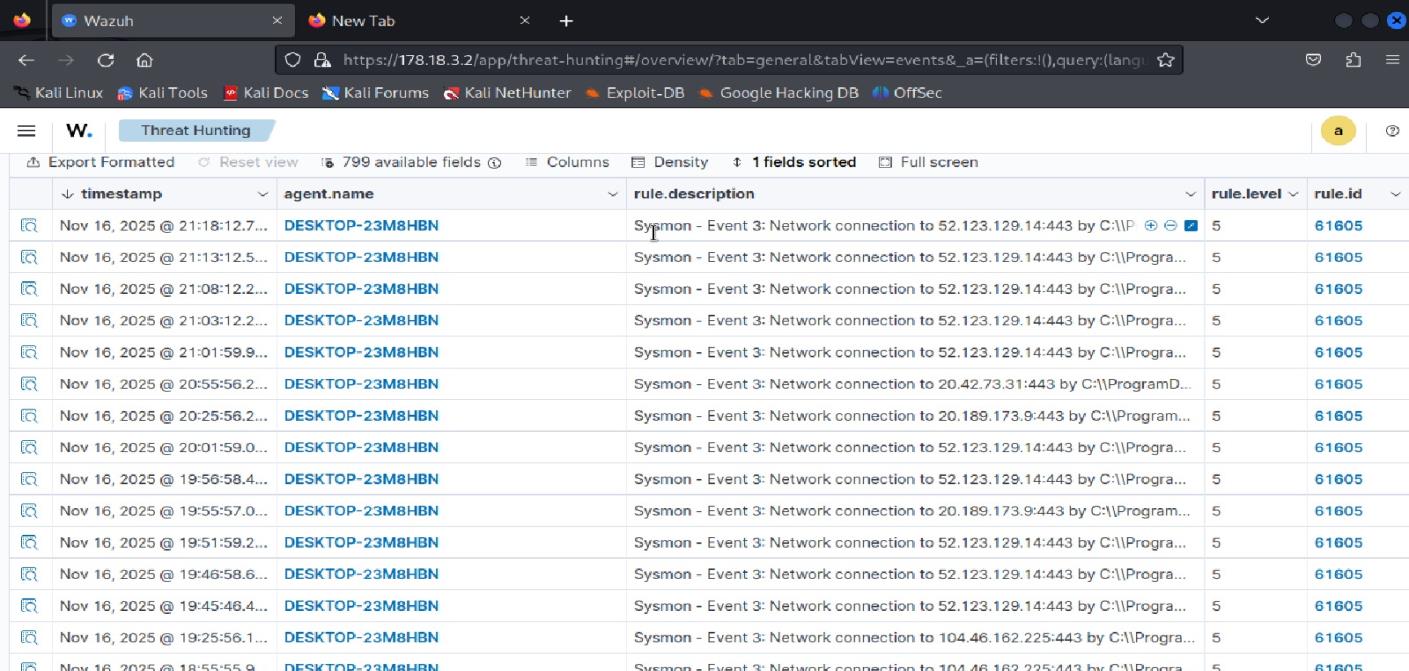 Detailed analysis of Rule ID 61605
 Registry modification detection showing service-related changes
MITRE ATT&CK Mapping
One of the most powerful features of Wazuh is its integration with the MITRE ATT&CK framework. We mapped detected events to understand attacker tactics:
 Wazuh MITRE ATT&CK view showing detected techniques
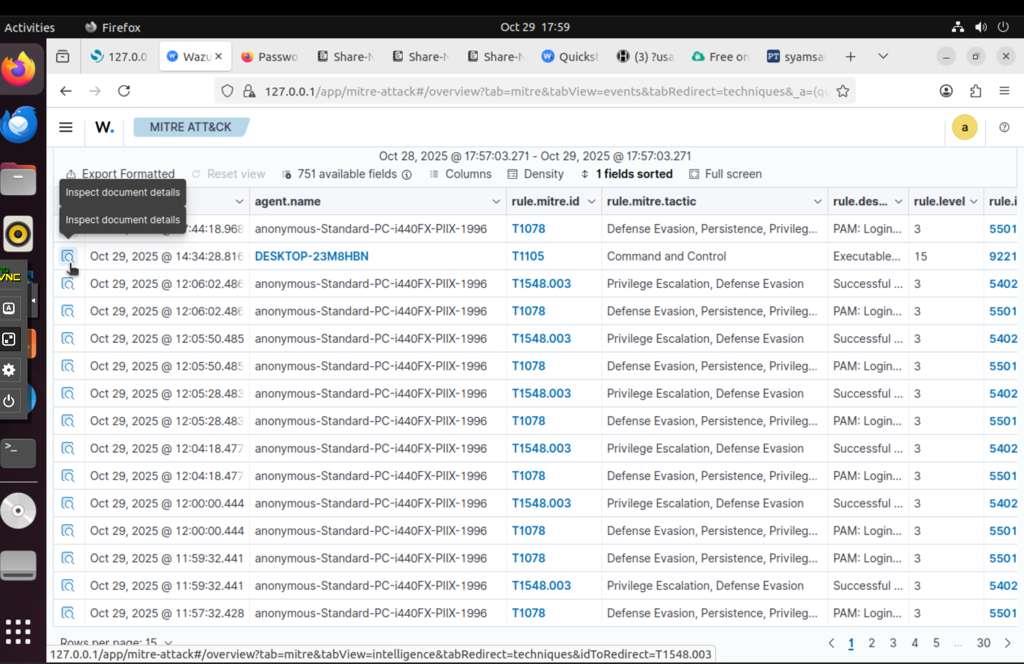
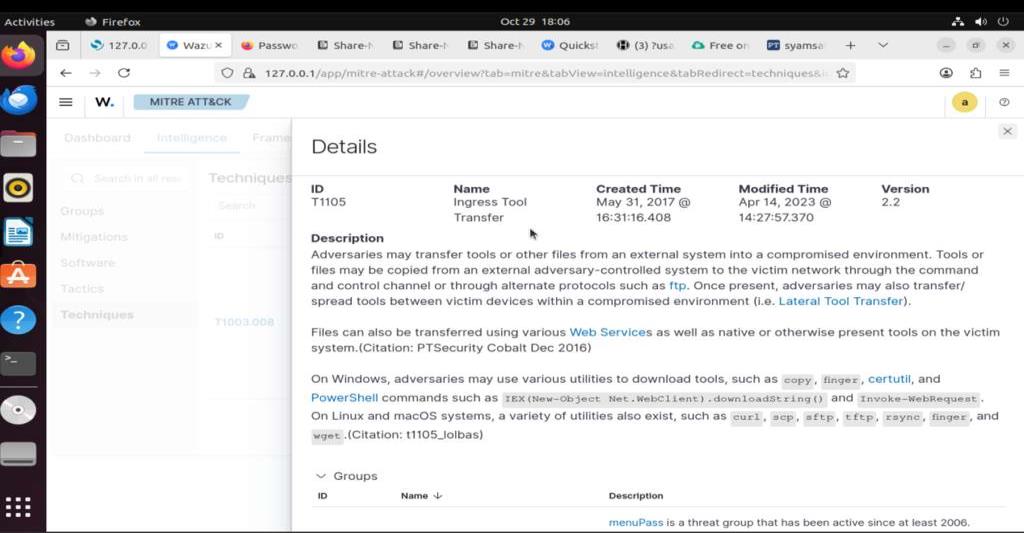
We investigated specific MITRE techniques like T1105 (Ingress Tool Transfer):
 Analyzing T1105 - Ingress Tool Transfer technique
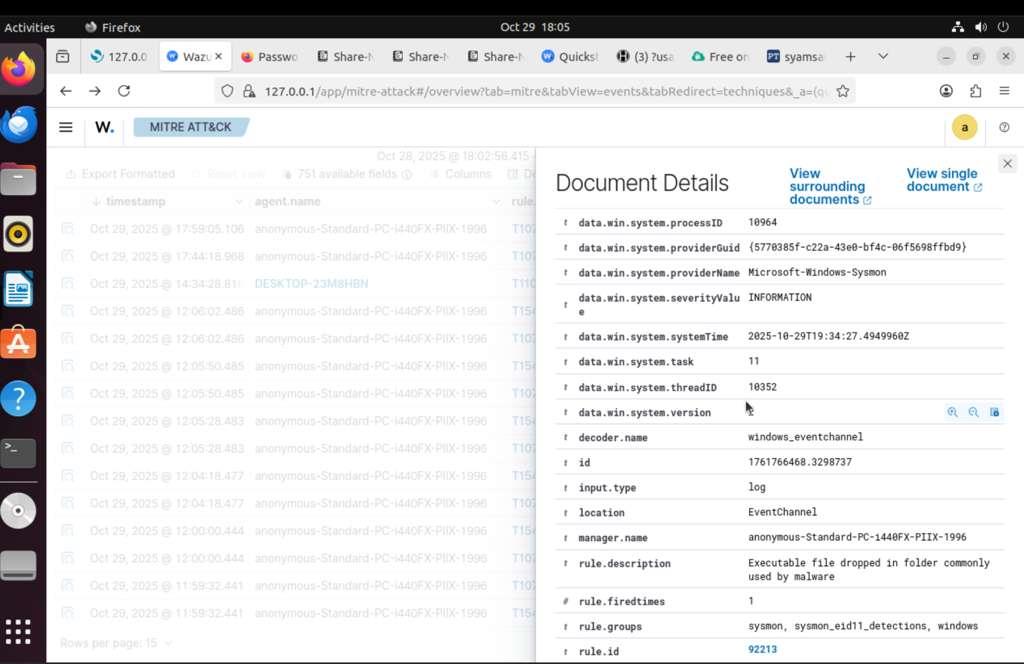 Event details in JSON format showing PowerShell execution
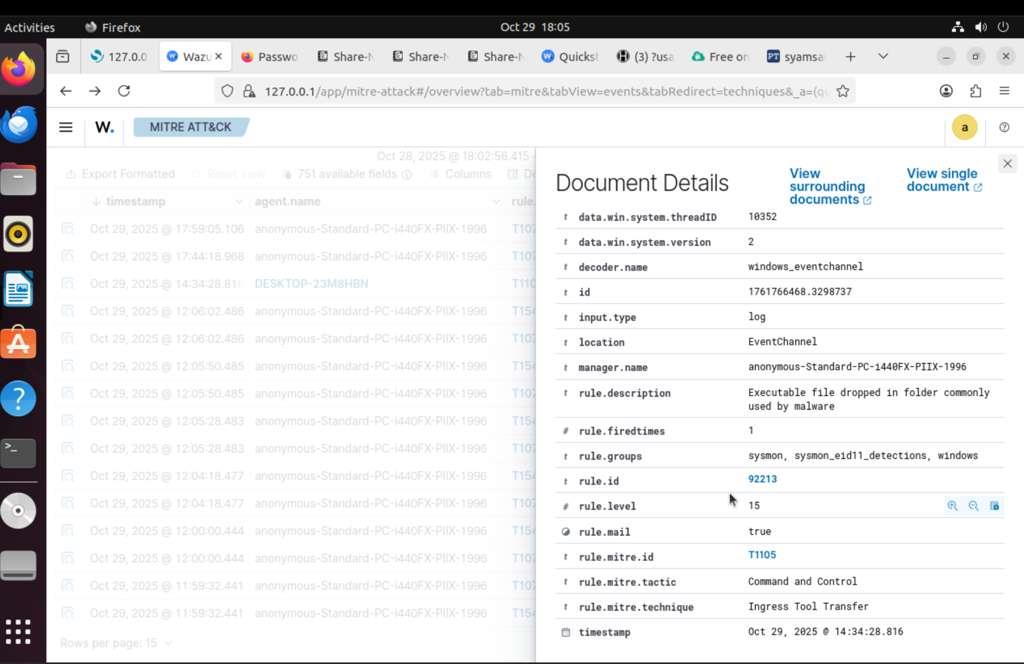 Complete event analysis with process details
 Event table view showing multiple T1105 detections
Learning Outcomes
This project taught me how to build and secure a full virtual network using Proxmox, VyOS, pfSense, Ubuntu, and Windows. I learned how IPs, gateways, NAT, DNS, and firewall rules must be configured correctly, and how small mistakes can break connectivity.
The Red Team work showed me how attackers use scanning, enumeration, and misconfigurations to gain access, especially through SMB and FTP.
The Blue Team work taught me how Wazuh and Sysmon collect and map events to MITRE ATT&CK, and how defenders detect suspicious behavior.
Troubleshooting network issues, fixing Wazuh agent problems, and working with teammates improved my problem-solving, patience, and communication.
Reflection
This project was challenging but gave me real experience in building, attacking, and defending a network. The first weeks were hardest due to routing and interface issues, but solving them helped me understand the network better.
Connecting the Wazuh agent and getting Sysmon events to appear took the most time, but fixing those problems improved my troubleshooting skills.
On the Red Team side, accessing SMB and FTP showed how simple weaknesses can be exploited. On the Blue Team side, analyzing alerts helped me understand how SOC monitoring works.
Overall, this project made me more confident with tools and improved both my offensive and defensive cybersecurity skills.
Conclusion
This Red vs Blue exercise provided hands-on experience with:
Offensive Skills (Red Team):
- Network reconnaissance and port scanning
- SMB enumeration and exploitation
- Web vulnerability analysis
- Identifying misconfigurations (FTP on port 123, SMB signing disabled)
Defensive Skills (Blue Team):
- SIEM deployment and configuration (Wazuh)
- Endpoint monitoring (Sysmon)
- Security event analysis
- MITRE ATT&CK threat intelligence mapping
- Incident detection and response
Key Lessons:
- Default configurations are dangerous - IIS, SMB, and FTP were all vulnerable in their default states
- Security by obscurity fails - Moving FTP to port 123 didn't hide it from basic scanning
- Monitoring is essential - Without Wazuh and Sysmon, we wouldn't have visibility into attacks
- Layered defense works - Multiple security controls (firewall rules, account lockout, monitoring) stopped many attacks
This project simulated real-world security operations and gave us practical experience that directly applies to SOC analyst, penetration tester, and security engineer roles.
Technologies Used
Infrastructure:
- Proxmox VE 8.4.0 - Virtualization platform
- VyOS - Software router
- pfSense 2.8.0 - Firewall and gateway
Operating Systems:
- Windows 10 Home - Target workstation
- Ubuntu Server - Security monitoring host
- Kali Linux - Red Team attack platform
Security Tools:
- Wazuh - SIEM and log analysis
- Sysmon - Windows system monitoring
- MITRE ATT&CK - Threat intelligence framework
- WireGuard - Secure VPN
Offensive Tools:
- Nmap - Network scanner
- Metasploit - Exploitation framework
- CrackMapExec - Post-exploitation
- Legion - Network enumeration
- rpcclient - RPC enumeration
- smbclient - SMB access
Project completed December 2025 as part of Saint Louis University's Master of Science in Cybersecurity program.